
Import Offline Responses
With Sogolytics, you can easily generate blank surveys for offline use. Simply print hard copies, ask participants to complete them, and then enter them back into the system. Importing data back into the platform can help simplify tasks such as entering offline responses, combining data from multiple projects, and more.
To import responses, your data should be in a spreadsheet in Sogolytics1 format. If you need to add responses from a previous survey into the new one, simply export via Sogolytics1 and then edit your spreadsheet (by copy-pasting or deleting) to include the responses which you would like to import back into the system.
Follow these steps to import your data.
- Select your project, then click Data. On the Data menu bar, click Import.
- First, upload your data.
- Under Select Import Type, select Import New Responses, and under Select Source, select From File.
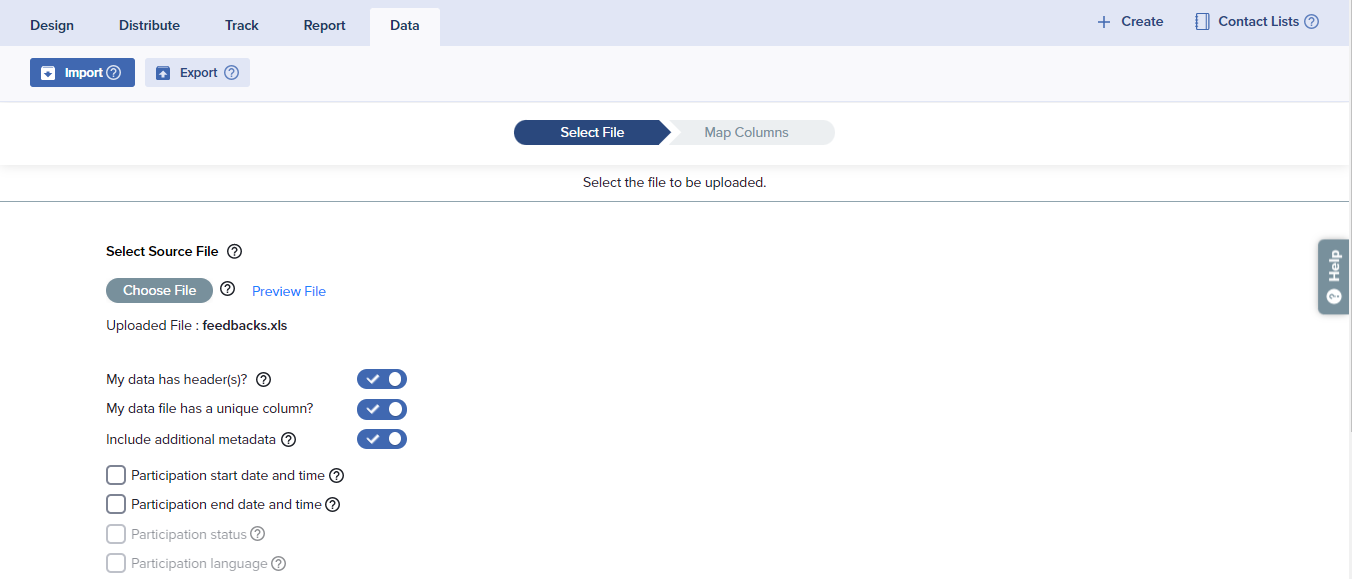
- Select a source file of .csv, .xls, or .xlsx format. (See Excel and CSV tips below.). Under Select Source File, click Choose File, then browse to your file and open it. The file name appears next to Uploaded File. If the file has more than one sheet, a Heads Up message tells you that only Sheet 1 will be imported. Optionally, click the eye icon to preview the file, or the delete icon to remove it and choose another.
- If the file contains a header row, turn on My data has header(s)?.
- If the file contains a column of email addresses or other unique identifiers, turn on My data file has a unique column?. If you leave it off, Sogolytics generates a unique identifier for each response.
- If you would like to include any additional metadata in your import – like participation date, time, language, IP Address and status – turn on Include additional metadata and select the check box for each type of metadata your file contains.
Points to remember when reviewing metadata:
- To use Complete/Incomplete participation status options, please enable ‘Save and Continue Later’ within Design Options.
- IP Address will not be available for Anonymous and Semi-Anonymous projects.
- Participation start and end date and time are not available for Anonymous and Semi-Anonymous projects, and the dates cannot be in the future.
- Participation language is available only for multilingual projects. Enter the name of a language enabled in the project, for example Spanish.
- If you select a start or end date and time, choose the format your file uses from the Format drop-down: mm/dd/yyyy hh:mm (for example, 09/18/2026 14:30) or dd/mm/yyyy hh:mm (for example, 18/09/2026 14:30).
- If you turn on Include additional metadata, select at least one option.
For example:A hotel group’s comment-card spreadsheet has a status column with Incomplete for cards where the guest skipped the second page. With Participation status selected, those rows are imported as partial responses.
- Optionally, turn on Link responses with a Directory? to associate each response with an existing contact or Activity record, so you can analyze responses alongside Directory information. Then select a linking option:
- Link responses with Directory only — Links responses with one or more Directories. Choose the Directory type from the first drop-down, then the Directory from the second. To link both Directory types, click the + icon and add another row. Each Directory type can be linked only once.
- Link responses with Directory and Activity — Links responses with records in an Activity, such as purchases or service visits. Choose the Directory, then the Activity. The Respondent Directory and the Feedback Recipient Directory are linked automatically, if applicable.
The two Directory types are:
- Respondent Directory — the people who responded to the survey.
- Feedback Recipient Directory — the people or entities the feedback is about, such as employees, vendors, or service providers.
On the Map Columns step, you then map a column from your file to a unique field in the Directory or Activity you selected.
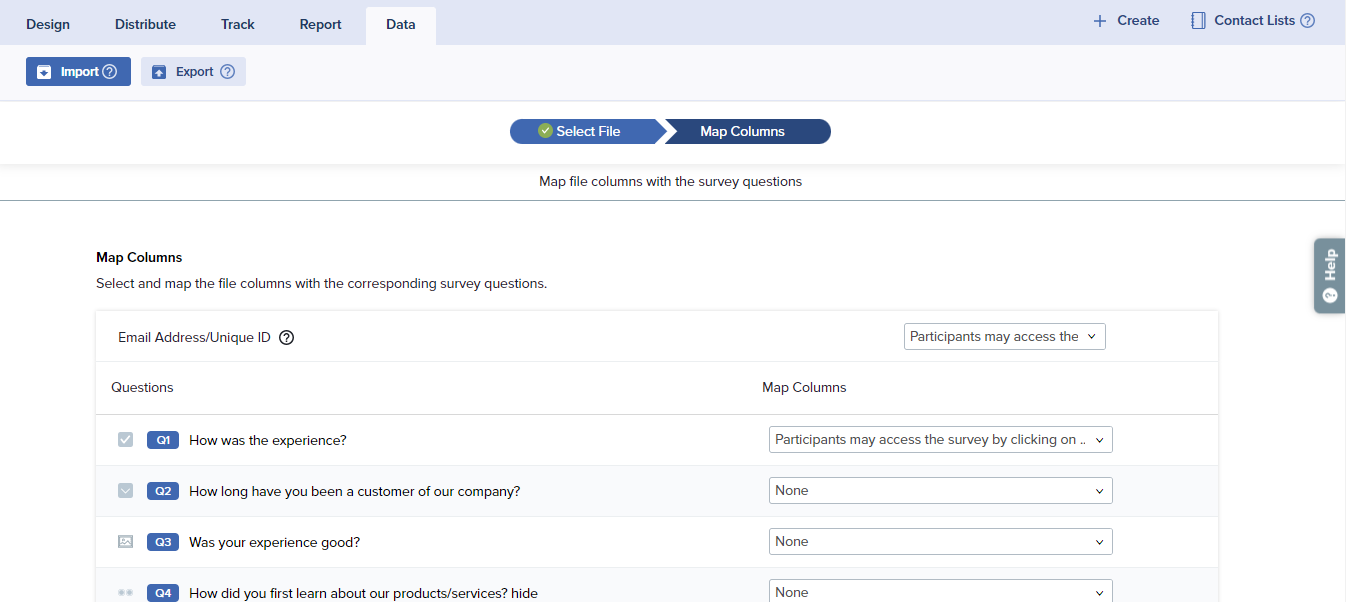
- If you linked responses with a Directory, map each row in the Map Directory/Activity Columns section: select the unique field from the Directory or Activity, then the file column that contains the matching values.
- Map Email Address/Unique ID to the file column that contains each response’s email address or unique ID (up to 75 characters). If My data file has a unique column? is off, this row shows System Generated and no selection is needed.
- Sogolytics automatically matches each question to a file column with the same question text. Review each match and select the correct column where needed. Grid and multi-part questions have one row per sub-question, such as Q3(a) and Q3(b).
- Leave a question set to None if you do not want to import data for it.
- Blanks or mismatches for date/time fields will be filled with the current date and time.
- Blanks or mismatches for participation status will be marked as Complete.
- Blanks or mismatches for language will default to the primary language.
- Blanks or mismatches for IP addresses will be left blank.
- If any answer mismatches or blanks are found, they can be downloaded and reviewed. Click Download Mismatch and Blank data file to get the details in the Download Manager, or click Continue to import anyway. If you click Continue, blank or mismatched answers are imported as unanswered.
- Lastly, click on Import Data to load your responses. This action submits the import request to the system.
- As confirmation, the message displayed identifies the approximate number of responses to be imported and notes that an email notification will be delivered to the account administrator when the import is complete. Click Import more responses to start another import, or Return to Home to leave the wizard.
It will normally take 15-20 minutes for the system to load the responses into the survey. While the data is being imported, you may continue to use other features of the platform.
- The imported responses will appear in the relevant project under “Track” after the import is successfully completed. When the import is complete, you receive an email titled Data Import Completed with the total number of responses imported.
- Review your results.
Points to remember when importing metadata:
Sogolytics does not check for duplicate responses. Each row is imported as a new response, even if its unique value already exists in the project.
- Unsupported file types show Your file must be .csv / .xls / .xlsx ., and files larger than 10 MB show The file to upload cannot exceed 10 MB. If the file contains no data, you are asked to review, update, and upload it again.
- Answers are matched to the project’s answer options by their text. Values that do not follow the Sogolytics1 format may not match and are imported as unanswered.
- Responses are linked only to records that already exist in the selected Directory or Activity, and the file value must exactly match the mapped field. Importing does not create or update Directory contacts.
- Directories or Activities with no records cannot be selected, and an Activity must have a unique field. Directory linking is not available for Anonymous projects and requires a Directory subscription.
- If the import would exceed your monthly or yearly response limit, an alert lets you continue and import only the responses available within the limit.
- Automation is not available for file imports. To import files automatically on a schedule, see Import Responses Using External Sources.
- To change responses after they are imported, use Update Existing Responses.
See also
Subscribe for tips and insights to drive better decisions!