


Export Automation
Easily schedule recurring exports of your project data via Email or SFTP to simplify and automate data sharing. This feature helps stakeholders stay informed with consistent access to the latest information while ensuring that external data repositories remain automatically updated for improved accuracy and availability.
This feature is ideal for ongoing projects that require regular reporting, stakeholder updates, data backups, or integration with external systems.
This feature is available as à la carte feature in our Enterprise plan. Contact us to take advantage of this option.
Why Use Recurring Exports?
- Save time by automating repetitive export tasks
- Ensure consistent and timely data delivery
- Maintain up-to-date data backups
- Streamline integration with external systems and databases
- Avoid missed reporting deadlines
- Keep stakeholders informed with scheduled updates
How to Set Up a Recurring Export
- Go to Data -> Export.
- Complete the initial steps of data export by configuring the required export file format, questions, and attributes.
- In the final Export Preference wizard, choose Setup Recurring Export.
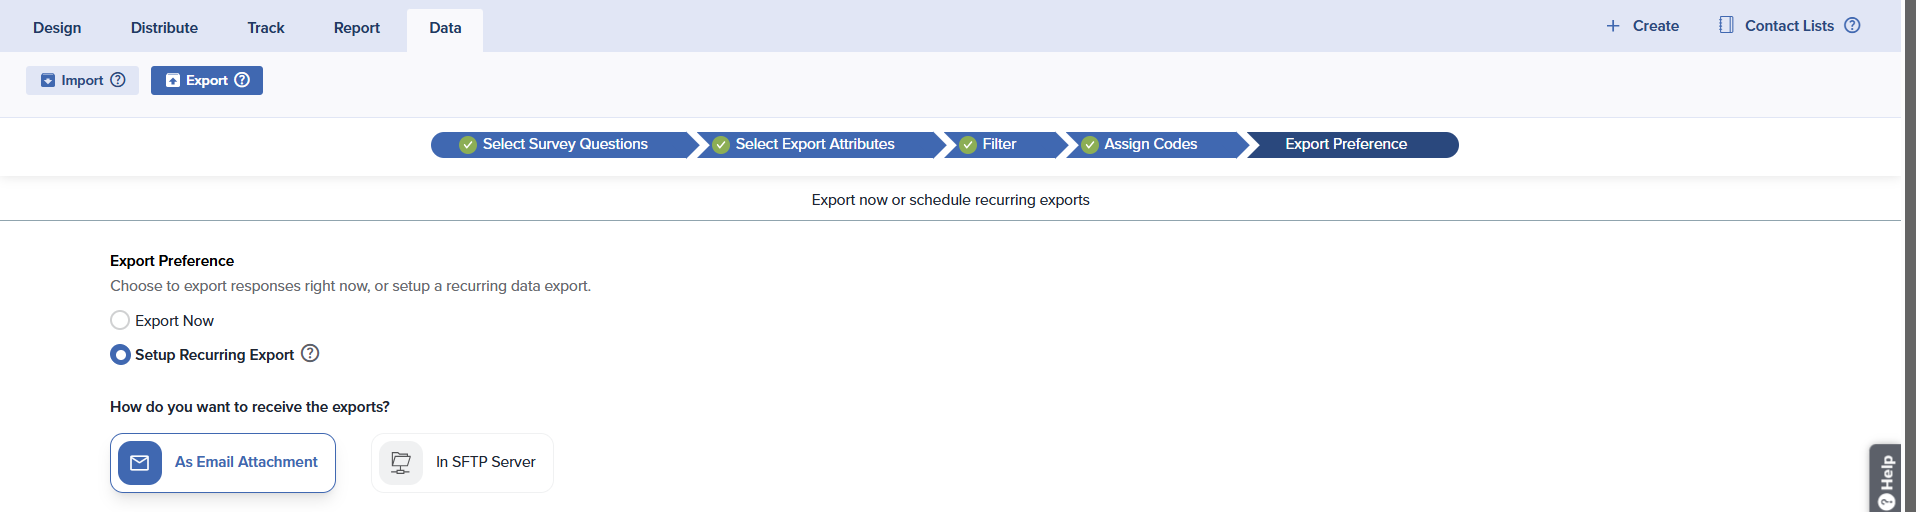
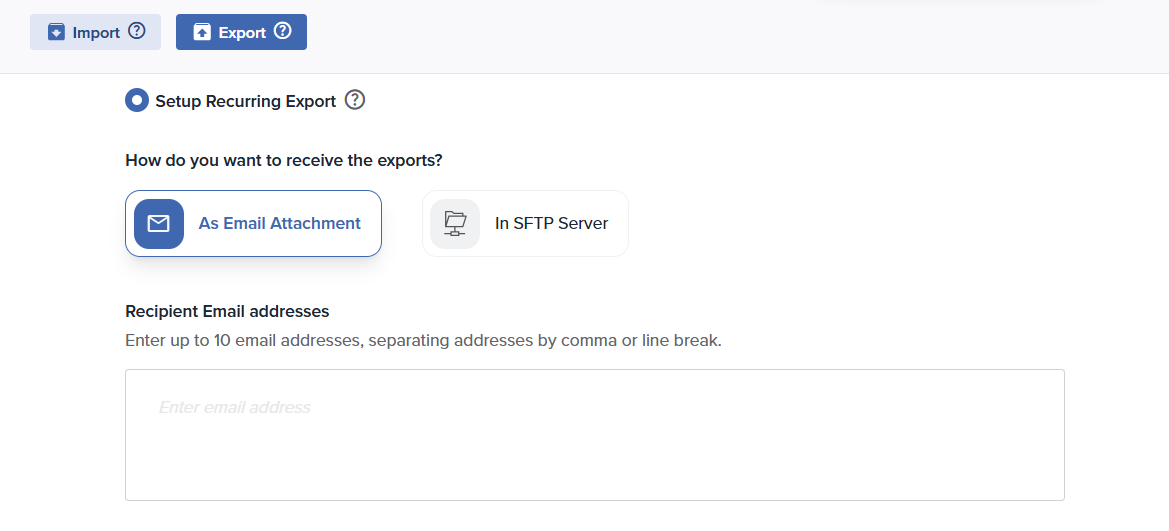
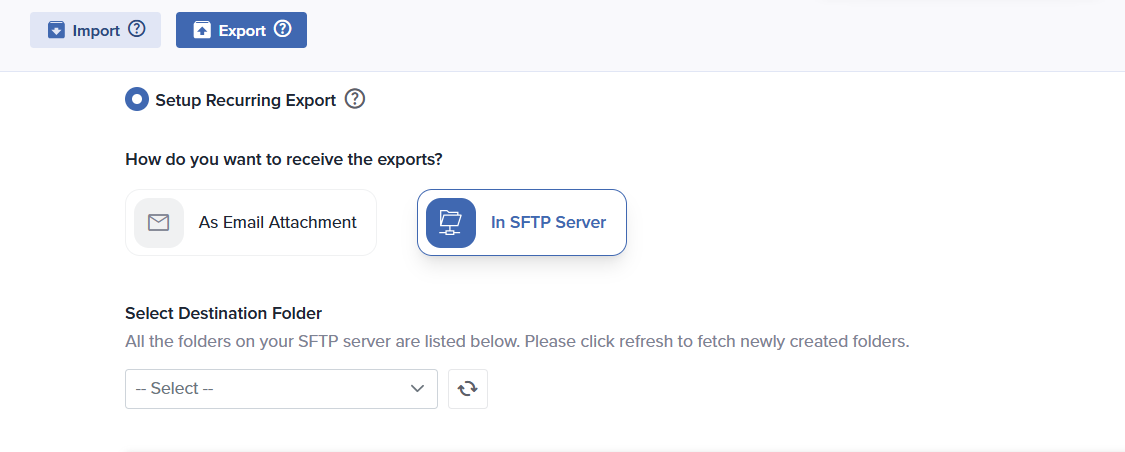
- Choose the method via which you want to receive the exported files: As an Email Attachment or In SFTP Server.
- As an Email Attachment: This option allows you to add a maximum of 10 recipients who will receive the exported files at the scheduled intervals as an email attachment. The client must enter at least one email address and may add multiple email addresses (up to 10) by separating them with a comma or a line break.
- In SFTP Server: If the client opts for this option, the exported files will be delivered at scheduled intervals to the SFTP server set up by our IT team in collaboration with the client. After selecting this option, the client must choose a destination folder on their SFTP server where the exported files should be delivered. These folders will be automatically fetched from the client’s SFTP server.
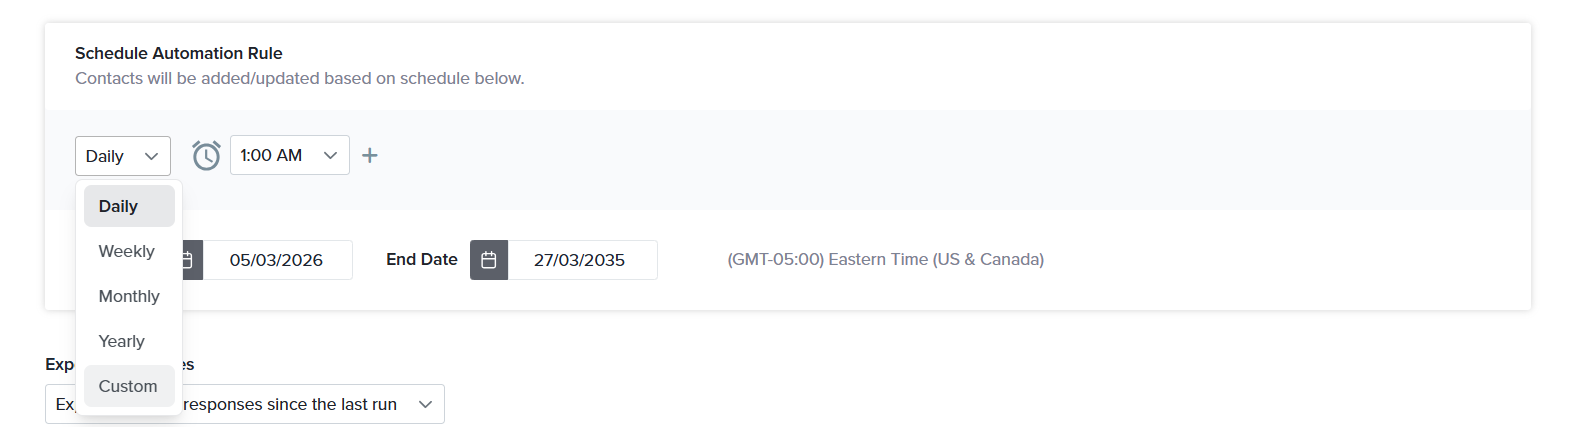
- Once you have selected the receiving method, configure the automation schedule based on when you want to receive the exported files. This automation schedule can be configured on a Daily, Weekly, or Monthly basis along with the time at which the rule should run.
- Choose the method via which you want to receive the exported files: As an Email Attachment or In SFTP Server.
- Next, set the Export preferences:
- Export only new responses since the last run: This option exports only the responses collected after the previous export was generated.
For example:
If your export schedule is set to Weekly on Monday at 10:30 AM, the first export might run on March 2 at 10:30 AM and will include all responses collected up to that time. The next export will run on March 9 at 10:30 AM and will include only the responses submitted after March 2 at 10:30 AM and before March 9 at 10:30 AM. The following export on March 16 at 10:30 AM will include only the responses submitted between March 9 at 10:30 AM and March 16 at 10:30 AM. In this way, each export contains only the new responses collected since the previous export.
If a response is edited after it has already been submitted, or if a respondent later returns to complete a previously incomplete response, the system will treat these as new updates. As a result, they will be included in the “Export only new responses since the last run” option during the next scheduled export.
- Export all responses: This option exports all responses collected for the project each time the rule runs, regardless of when they were submitted.
For example:
If your export schedule is set to Weekly on Monday at 10:30 AM, the first export may run on March 2 at 10:30 AM, exporting all responses collected up to that time. The next export will run on March 9 at 10:30 AM and will again include all responses collected from the start of the project up to March 9 at 10:30 AM.
- Next, configure the Export Only If More Than X Responses Are Received Since the Last Run. This option allows you to set a minimum threshold for the number of responses required before an export is generated. The export will run only if the number of new responses received since the previous export exceeds the specified value. This helps prevent exports from being generated when only a small number of responses have been collected.
- Toggle on the Email Alerts if you want to receive the following notifications:
- Send an Alert Email to Confirm Successful Rule Execution, But No Responses Are Exported: Select this option if you want to receive a notification when the automation rule runs successfully but no responses meet the export conditions.
- Send Alert Email If Automation Fails: Enable this option to receive an email notification if the scheduled export fails due to a system error or configuration issue. This allows you to quickly identify and resolve the problem.
- Toggle on the Would you like to send alerts to any alternate email addresses? to specify alternate email addresses that should receive export notifications along with the primary recipient. You can enter up to 10 email addresses, separating each address with a comma or a line break.
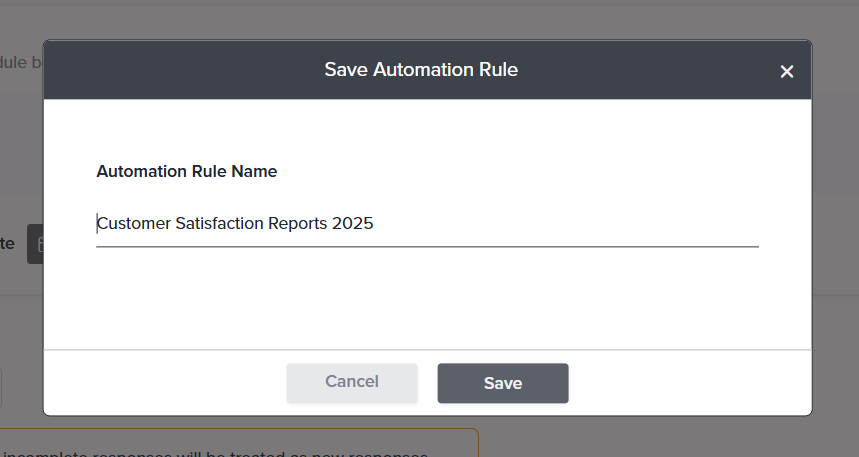
- Once you have completed the configuration, click Save. Enter the automation rule name in the Save Automation Rule dialog box that appears, and then click Save.
- Next, set the Export preferences:
Managing Recurring Exports
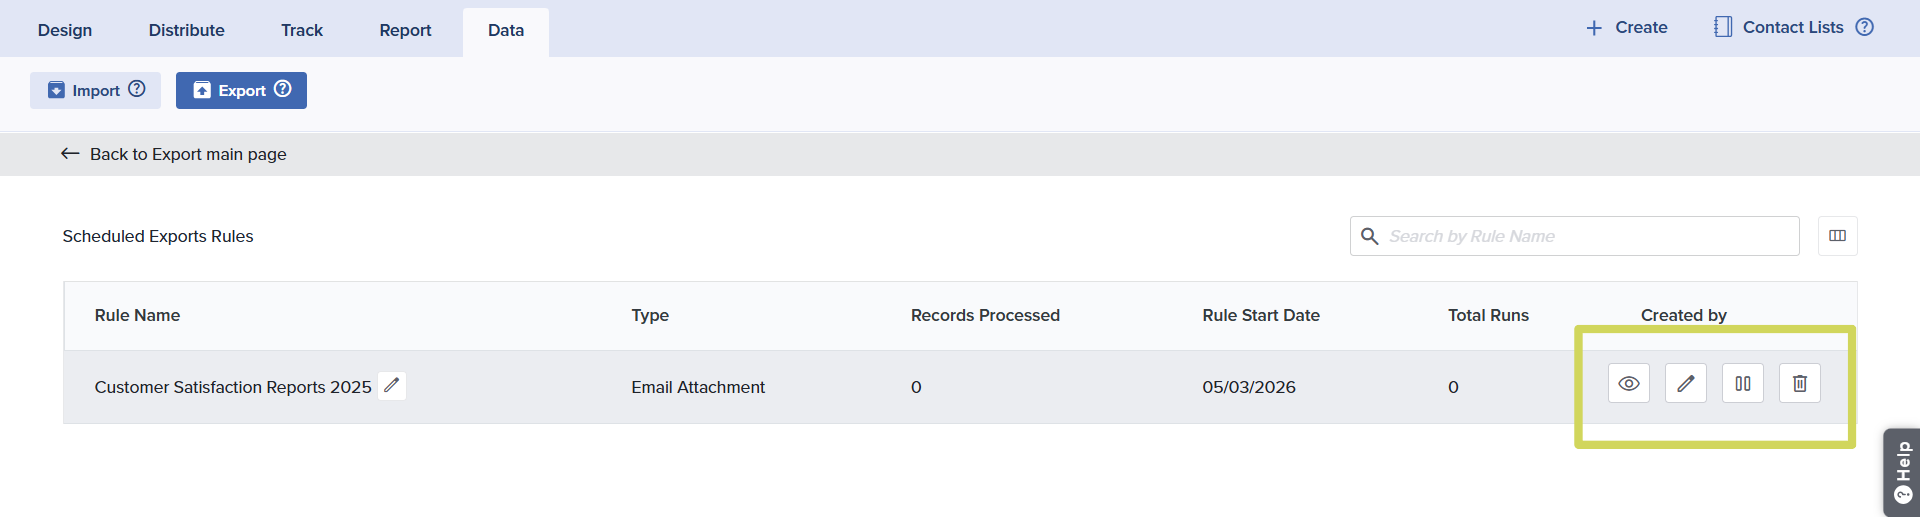
Once you save your automation rule, you will land on the Export Home page. Click on View Automation Rules to view and manage existing rules. When you open this section, you will see a table listing all your rules, with the most recently created rule appearing at the top. Hover over any rule to perform the following actions: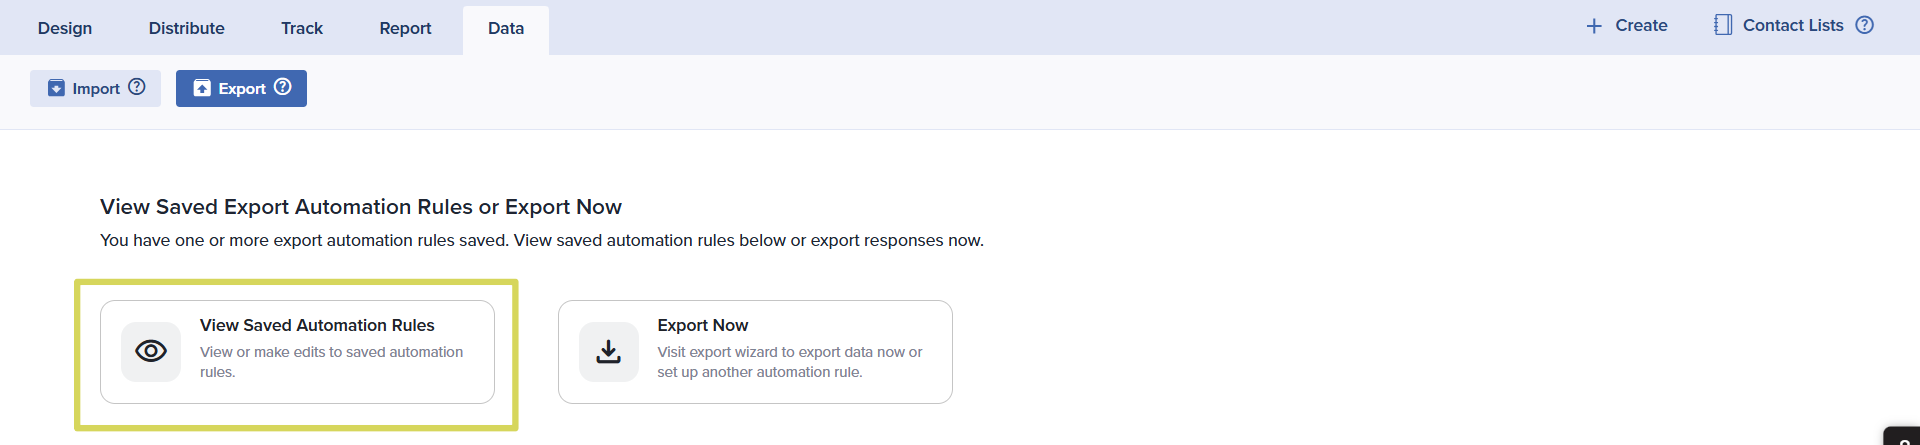
- View – This option gives you a preview of the applied rule.
- Edit – This option allows you to modify the configurations of the applied rule.
- Pause – This option allows you to temporarily stop exports without deleting the automation rule.
- Delete – This option allows you to permanently delete the export automation rule.
- Multiple export automation rules can be created for a single project.
- Rules created under a project are visible to all subusers who have access to that project, including the admin.
- The creation, deletion, editing, and pausing of automation rules are logged under Account Activity in Account Settings.
Subscribe for tips and insights to drive better decisions!

