


Build Activity Using External Sources
Want to track important interactions related to your contacts? Activities allow you to store and manage transactional or event-based records associated with contacts in a Directory. Using Activities, you can track information such as purchases, service visits, support cases, or any other events connected to your contacts.
A retail company maintains a Customer Directory containing customer contact details such as Name, Email Address, and Phone Number. The company wants to track customer purchases so they can later collect feedback about recent purchases.
To achieve this, they create an Activity called Purchase History and import purchase records from an Excel file. Each record contains information such as Customer Email, Product Purchased, Purchase Date, Store Location, and Amount.
Navigate to
Build Activity Using Salesforce
To build an Activity using Salesforce as an external source, follow the steps below:
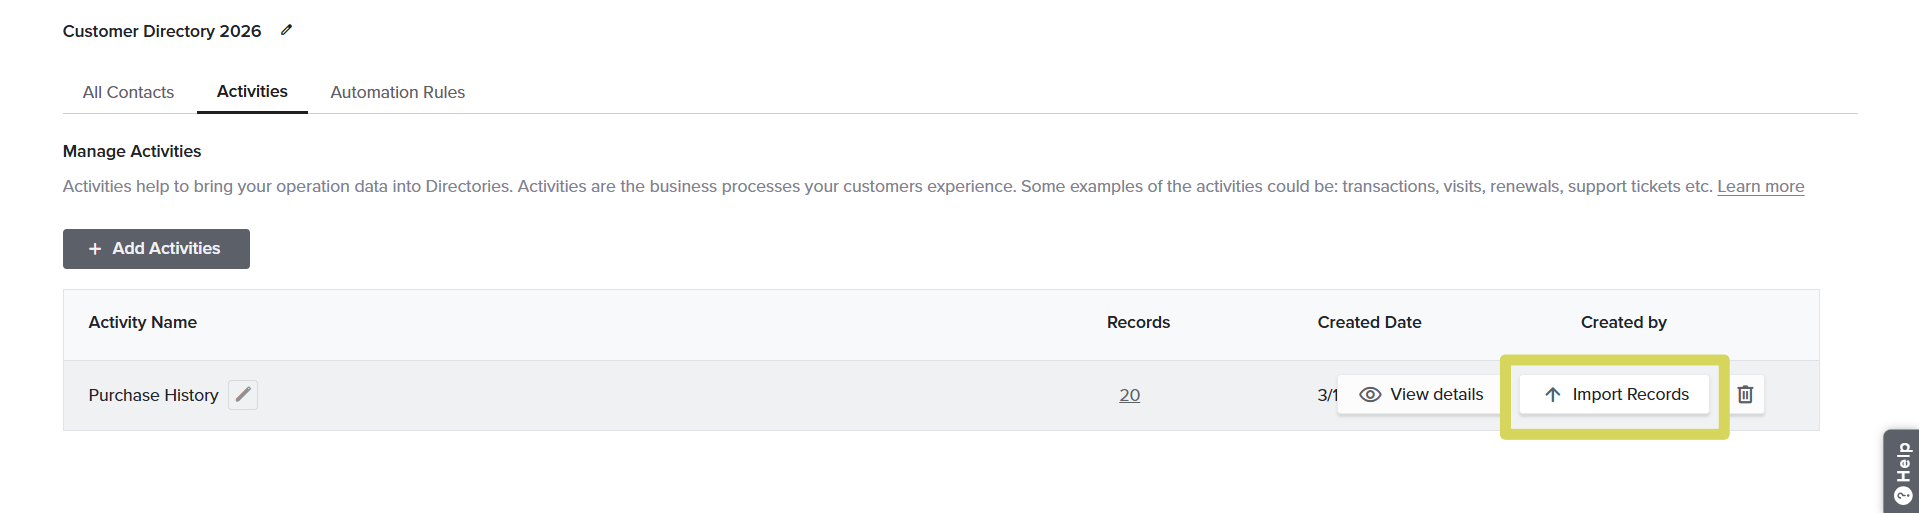
- Open the Directory where you want to create the Activity, and navigate to the Activities tab next to the All Contacts tab.
- Click + Add Activities, enter a name for the Activity, and use + Add Activity if you want to create additional Activities.
- Once you have added the required Activity name(s), click Save. The newly created Activities will appear under the Activities tab.
- Next, hover over the Activity into which you want to import records and select Import Records.
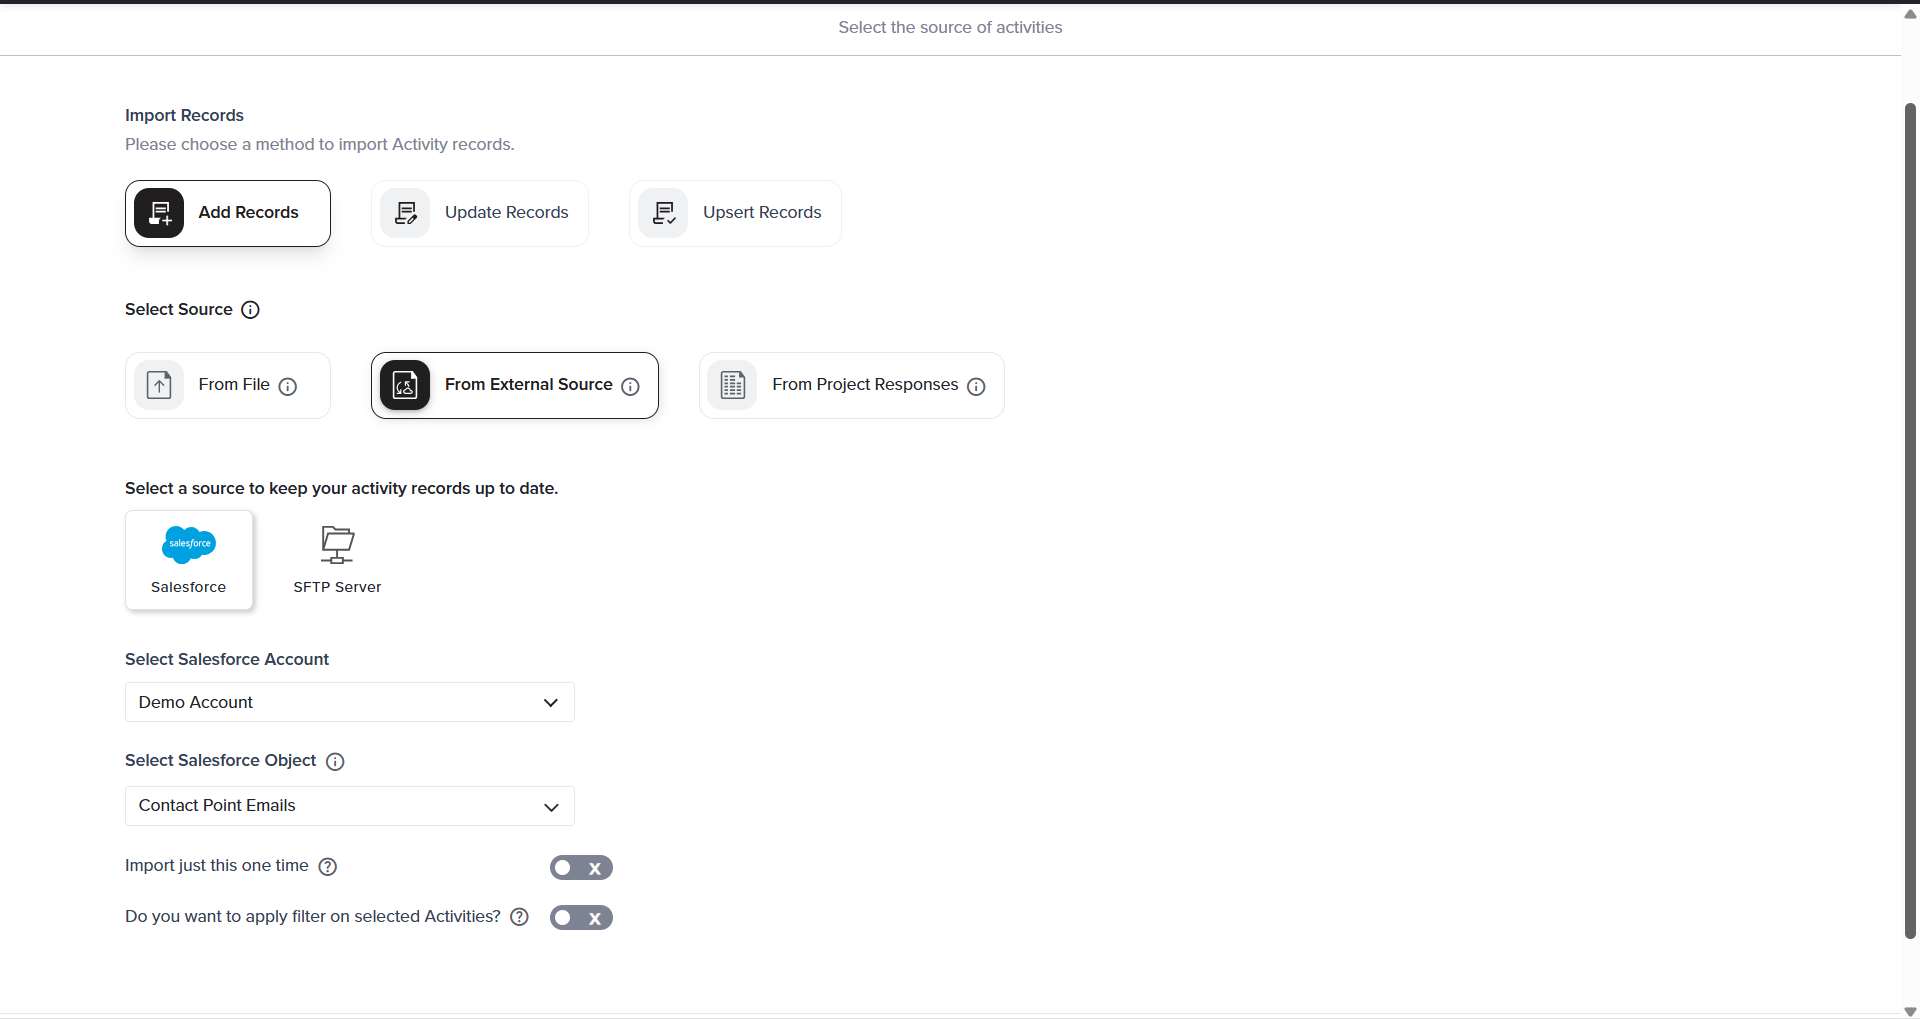
- Select From External Sources and choose Salesforce. Then, select the appropriate Salesforce Account and choose the Salesforce Object you want to use as the data source.
- After selecting the source, use the Import just this one time toggle to define how the data should be imported:
- Enable this option to perform a one-time import.
- Disable this option to establish a continuous connection with Salesforce, allowing data to be imported automatically based on a defined schedule.
- If required, you can further refine the data by enabling Do you want to apply a filter on selected contacts? and defining the criteria in the side panel.
- Once the source and filters are configured, proceed to the Define Directory Lookup step to create a mapping rule that connects Activity records with contacts in the parent Directory.
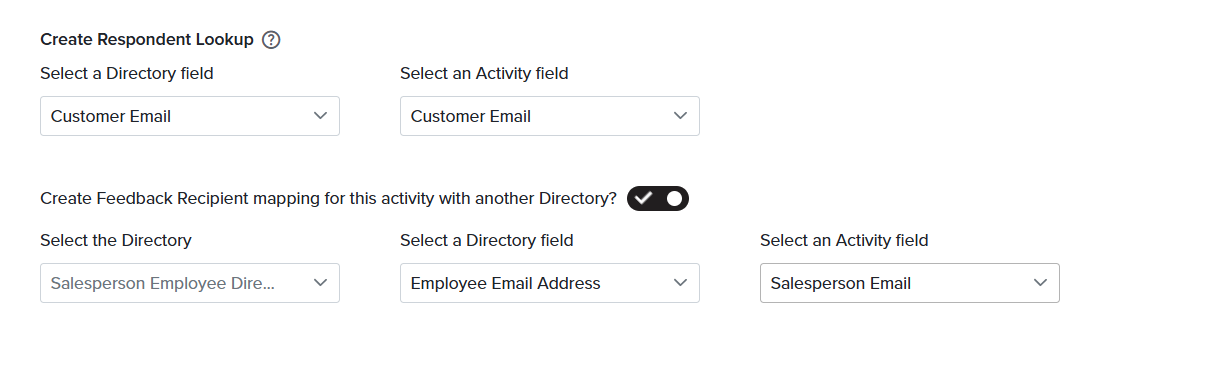
- Respondent Mapping: This is used when the survey respondents are contacts in the same Directory where the Activity exists. To configure Respondent Mapping, follow the steps below:
- Select the Directory Field you want to use for the lookup.
- Map it to the corresponding Activity Field.
- Feedback Recipient Mapping: This is used when the feedback recipient belongs to a different Directory, such as employees, vendors, or service providers. To configure Feedback Recipient Mapping, follow the steps below:
- Toggle Create Feedback Recipient Mapping.
- Select the Directory from which the feedback recipients will be pulled.
- Choose the appropriate Directory Field.
- Ensure it matches the corresponding Activity Field.
- The Directory field used for respondent mapping must exactly match a field in the Activity.
- The Feedback Recipient Directory must be different from the Respondent Directory.
- Once mapping is created, it cannot be edited. To make changes, delete and recreate the Activity.
- Click Continue to proceed to field mapping.
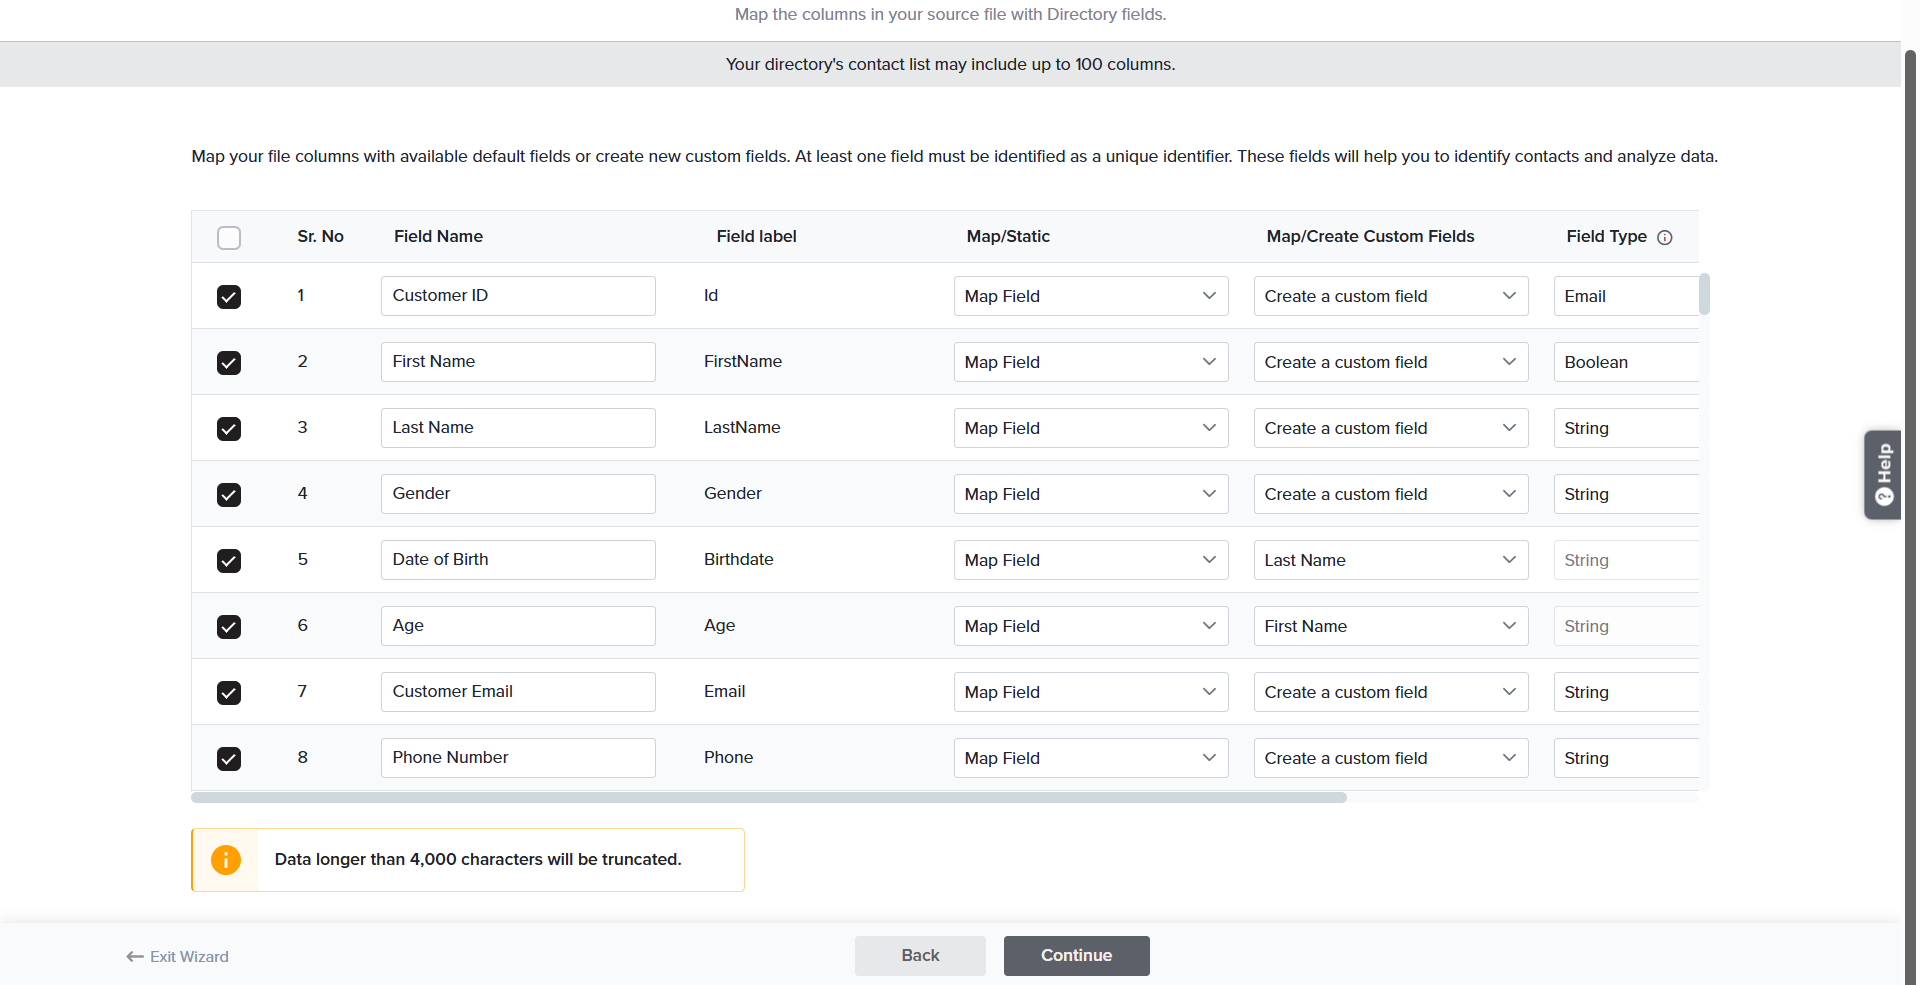
- Map Fields: Define the field type for each imported field.
- Customer Email (Email)
- Product Purchased (String)
- Purchase Date (Date)
- Store Location (String)
- Amount (Number)
- String – Used for text-based information.
- Email – Used for storing email addresses.
- Number – Used for storing integer values.
- Date – Used for saving dates in the following formats: MM/DD/YYYY, DD/MM/YYYY, YYYY-MM-DD.
- Time – Used for saving time as hh:mm or hh:mm:ss.
- Date-Time – Used for saving date and time in the following formats: MM/DD/YYYY hh:mm, DD/MM/YYYY hh:mm, YYYY/MM/DD hh:mm, MM/DD/YYYY hh:mm:ss, DD/MM/YYYY hh:mm:ss, YYYY/MM/DD hh:mm:ss
- Boolean – Used for saving Boolean values such as 1|0, Yes|No, Y|N, True|False. These values are normalized to True and False after importing.
- Phone – Used for saving phone numbers. You can specify the country code by clicking the gear icon next to the Field Type column.
- URL – Used for saving URLs.
- Click Continue after completing field mapping.
- If Import just this one time is enabled, valid records will be processed immediately and the activity will be created. Otherwise, you will be redirected to the Automation Rules wizard.
- In the Automation Rules wizard, define when and how records should be imported by selecting a schedule: Daily, Weekly, Monthly, Custom, or System Defined (Hourly).
- Daily: Runs every day at 10:00 AM starting from 1 January 2026.
- Weekly: Runs on the selected day of the week (e.g., Monday) at 10:00 AM. The first run will occur on the next matching day:
- 5 Jan 2026 (Monday) – 10:00 AM
- 12 Jan 2026 (Monday) – 10:00 AM
- Monthly: If the rule is configured to run on the 1st of every month at 10:00 AM, it will execute as follows:
- 1 Jan 2026 – 10:00 AM
- 1 Feb 2026 – 10:00 AM
- Custom:
- Every 2 days: 1 Jan, 3 Jan, 5 Jan…
- Every 2 weeks: 1 Jan, 15 Jan, 29 Jan…
- Every 3 months: 1 Jan, 1 Apr, 1 Jul…
- System Defined: Runs every hour automatically.
- Define the Start Date and End Date for the automation rule.
- Enable Email Alerts to receive notifications for success, failure, or exceptions.
- Finally, click Save Automation Rule, provide a name, and click Done.
- Your automation rule is now set up and your Activity will be created within a few minutes.
- Open the Directory where you want to create the Activity, and navigate to the Activities tab.
- Click + Add Activities, enter a name for the Activity, and use + Add Activity to create additional Activities if needed.
- Click Save. The newly created Activities will appear under the Activities tab.
- Hover over the Activity and click Import Records.
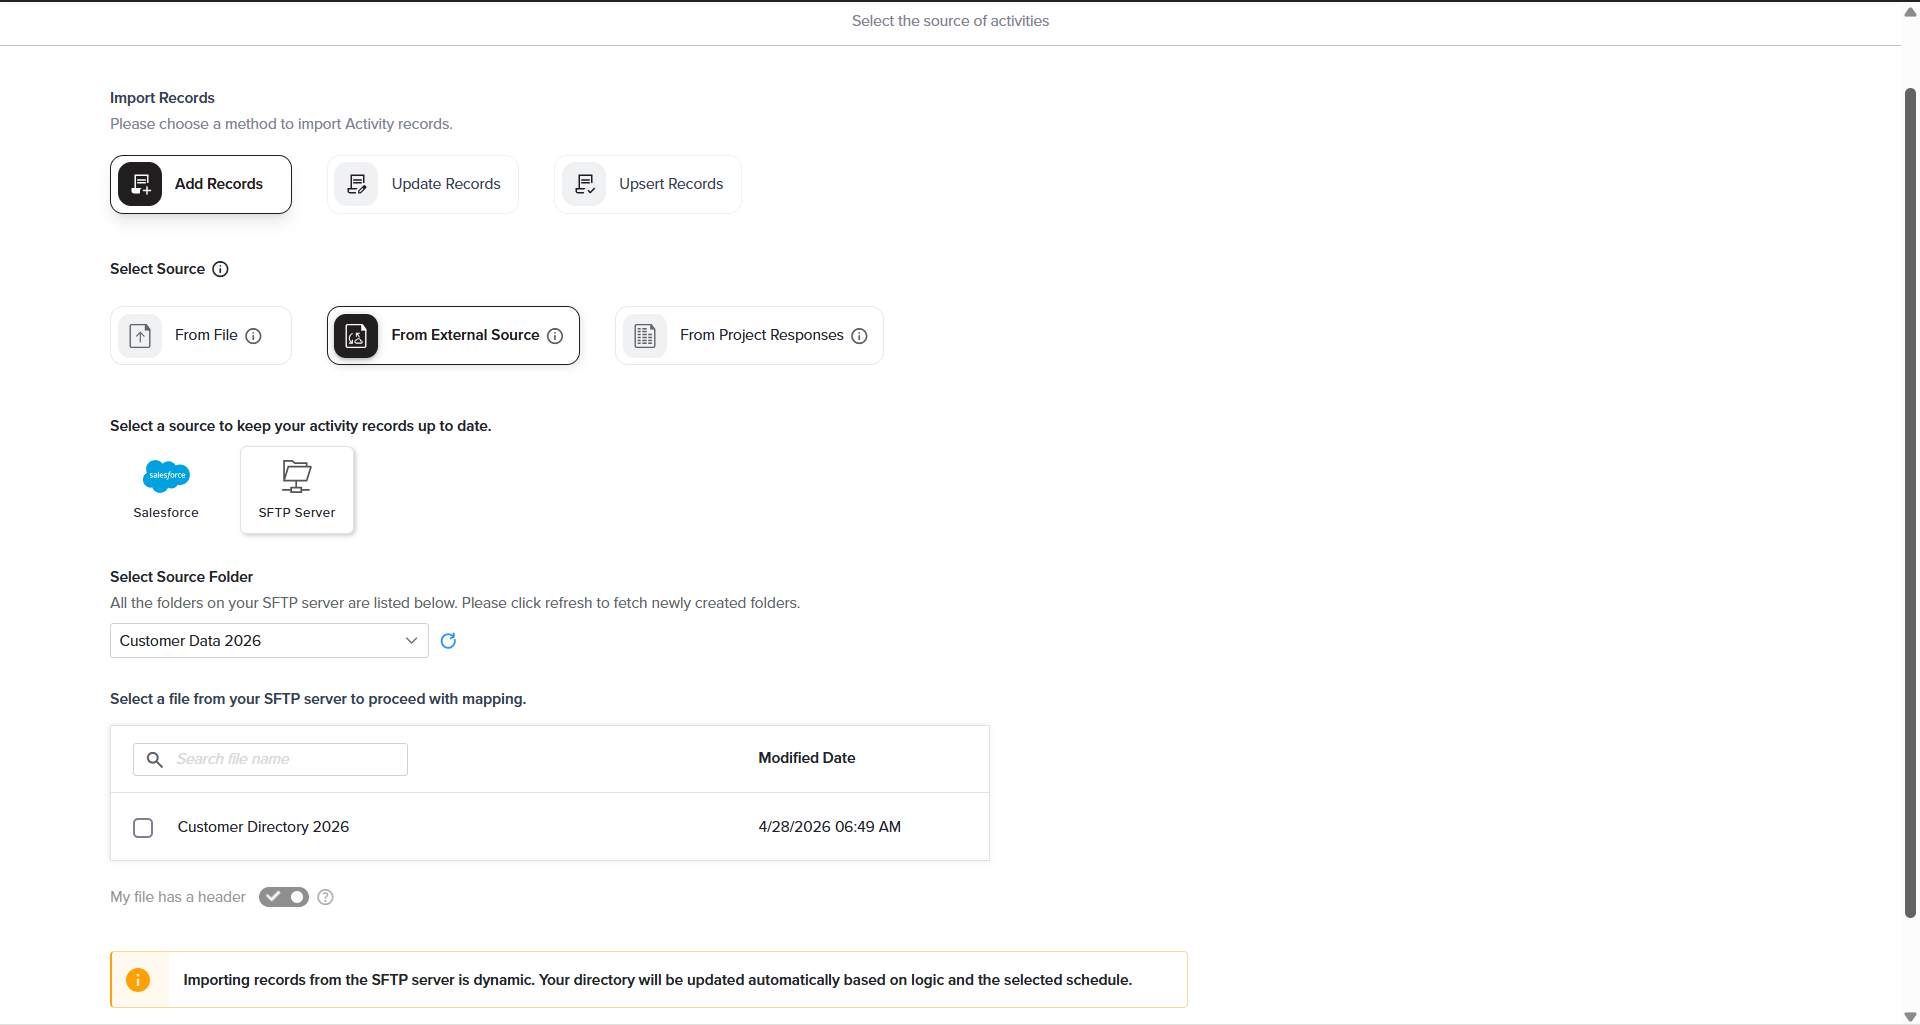
- Select From External Sources and choose SFTP.
- Select the folder from which you want to import data. All available folders will be listed. Click the Refresh icon to fetch newly created folders.
- After selecting the folder, choose a file to use as a sample for mapping and click Continue.
- Imports from SFTP are dynamic and follow the defined automation rules.
- The sample file must match the format of the actual files used for import.
- The selected file is used only for mapping; no records are imported at this stage.
- Any mismatch in file structure may cause import failures.
- Next, in the Define Directory Lookup step, create a mapping rule to connect Activity records with contacts in the parent Directory.
- Respondent Mapping: This is used when the survey respondents are contacts in the same Directory where the Activity exists. To configure Respondent Mapping, follow the steps below:
- Select the Directory Field you want to use for the lookup.
- Map it to the corresponding Activity Field.
- Feedback Recipient Mapping: This is used when the feedback recipient belongs to a different Directory, such as employees, vendors, or service providers. To configure Feedback Recipient Mapping, follow the steps below:
- Toggle Create Feedback Recipient Mapping.
- Select the Directory from which the feedback recipients will be pulled.
- Choose the appropriate Directory Field.
- Ensure it matches the corresponding Activity Field.
- The mapping field must match exactly between Directory and Activity.
- The Feedback Recipient Directory must be different from the Respondent Directory.
- Mappings cannot be edited after creation.
- Click Continue to proceed to field mapping.
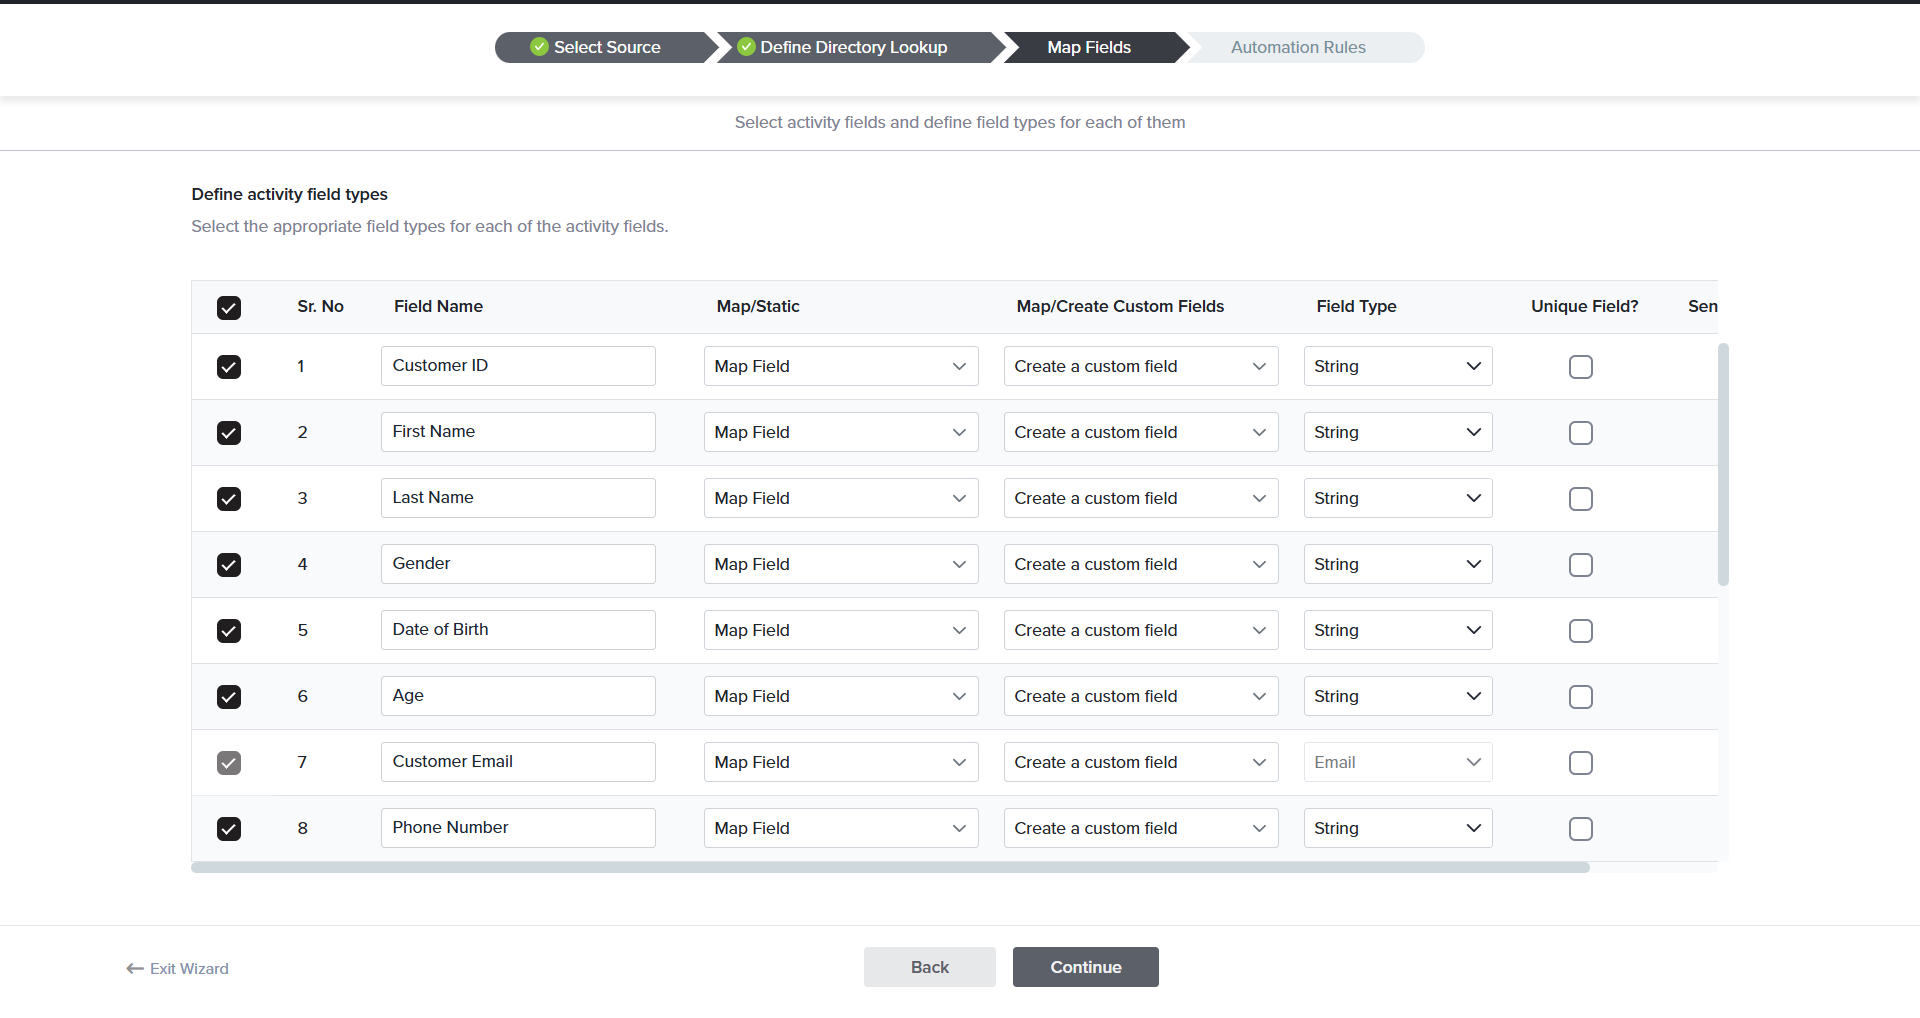
- Map Fields: Assign the appropriate field type for each imported field.
- String – Used for text-based information.
- Email – Used for storing email addresses.
- Number – Used for storing integer values.
- Date – Used for saving dates in the following formats: MM/DD/YYYY, DD/MM/YYYY, YYYY-MM-DD.
- Time – Used for saving time as hh:mm or hh:mm:ss.
- Date-Time – Used for saving date and time in the following formats: MM/DD/YYYY hh:mm, DD/MM/YYYY hh:mm, YYYY/MM/DD hh:mm, MM/DD/YYYY hh:mm:ss, DD/MM/YYYY hh:mm:ss, YYYY/MM/DD hh:mm:ss
- Boolean – Used for saving Boolean values such as 1|0, Yes|No, Y|N, True|False. These values are normalized to True and False after importing.
- Phone – Used for saving phone numbers. You can specify the country code by clicking the gear icon next to the Field Type column.
- URL – Used for saving URLs.
- Click Continue to proceed to the Automation Rules wizard.
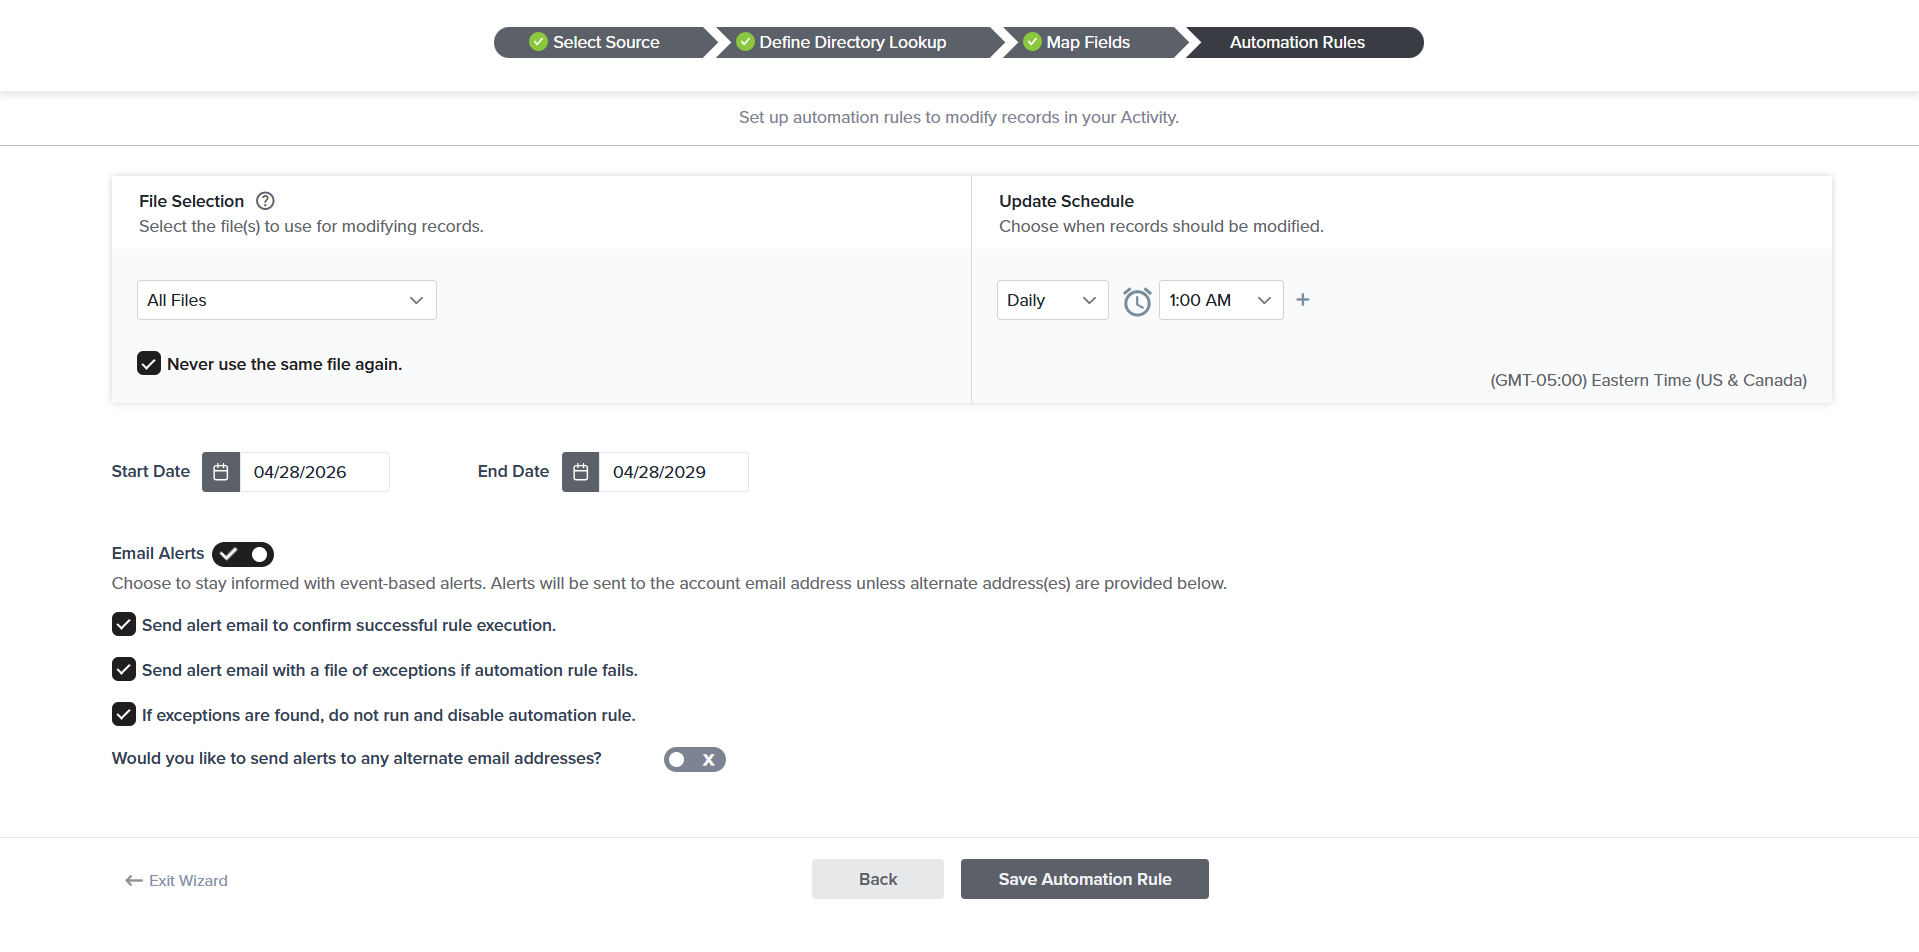
- In the File Selection step, choose how files should be processed:
- All files
- New files only
- Files uploaded on selected days
Enable Never use the same file again to avoid duplicate imports.
- Define the schedule for importing contacts: Daily, Weekly, Monthly, Custom, or Hourly.
- Daily: Runs every day at 10:00 AM starting from 1 January 2026.
- Weekly: Runs on the selected day of the week (e.g., Monday) at 10:00 AM. The first run will occur on the next matching day:
- 5 Jan 2026 (Monday) – 10:00 AM
- 12 Jan 2026 (Monday) – 10:00 AM
- Monthly: If the rule is configured to run on the 1st of every month at 10:00 AM, it will execute as follows:
- 1 Jan 2026 – 10:00 AM
- 1 Feb 2026 – 10:00 AM
- Custom:
- Every 2 days: 1 Jan, 3 Jan, 5 Jan…
- Every 2 weeks: 1 Jan, 15 Jan, 29 Jan…
- Every 3 months: 1 Jan, 1 Apr, 1 Jul…
- Instantly: The system automatically checks the SFTP server every 15 minutes for new or updated files and updates Activity contacts accordingly.
- Define the Start Date and End Date.
- Enable Email Alerts on your registered email ID to stay informed about any of the following events:
- Send alert email to confirm successful rule execution.
- Send alert email if automation fails.
- If exceptions are found when UIDs in the file are checked, send an email with a file of exceptions.
- If exceptions are found, do not send, and disable further automation.
You can also choose to send alerts to alternate email addresses by enabling the Would you like to send alerts to any alternate email addresses? toggle.
- Once you have set up the automation rule, click on Save Automation Rule. In the modal that appears, enter the desired name for the automation rule. You can also enable Initial Sync to import records from all relevant files defined in the automation rule as soon as the rule is saved. This is a one-time process; all future updates will follow the configured automation schedule.

Initial Sync is a one-time sync. Moving forward, the data sync will occur as per the automation rule.
- Your automation rule is now set up and your Activity will be created within a few minutes.
A maximum of 50 activities can be added per Directory.
Based on the example above, you may name the Activity Purchase History.
In the Purchase History example, the Email Address from the Customer Directory can be mapped to the Customer Email field in the Activity to link each purchase record to the correct customer.
There are two types of Activity mapping:
Continuing with the retail company example, the company may want to collect feedback about the salesperson who assisted the customer.
In this case, the customer remains the respondent from the Customer Directory, while the salesperson belongs to a separate Salesperson Employee Directory (Feedback Recipient Directory).
The Activity file may include a field such as Salesperson Email or Salesperson ID, which can be mapped to the corresponding field in the Salesperson Directory. This ensures feedback is sent to the correct salesperson.
Available field types include:
If the rule is set on Thursday, 1 January 2026, the schedule will run as follows:
During initial Directory creation, Upsert and Update options are unavailable. These can be enabled later once Contacts are added.
Build Activity Using SFTP
To build an Activity using SFTP as an external source, follow the steps below:
Before using SFTP as an external source, ensure that it is set up in your account. To learn more, refer to Sogolytics SFTP Server Setup.
A maximum of 50 activities can be added per Directory.
You may name the Activity Purchase History.
There are two types of Activity mapping:
Continuing with the retail company example, the company may want to collect feedback about the salesperson who assisted the customer.
In this case, the customer remains the respondent from the Customer Directory, while the salesperson belongs to a separate Salesperson Employee Directory (Feedback Recipient Directory).
The Activity file may include a field such as Salesperson Email or Salesperson ID, which can be mapped to the corresponding field in the Salesperson Directory. This ensures feedback is sent to the correct salesperson.
Customer Email (Email), Product (String), Purchase Date (Date), Amount (Number)
Available field types include:
If the rule is set on Thursday, 1 January 2026, the schedule will run as follows:
Subscribe for tips and insights to drive better decisions!

