
Intro to Activities
An Activity is a set of transactional or event-based records — purchases, service visits, support cases, appointments, or training sessions — stored inside a Directory and linked to the contacts inside it. Instead of a static list of contacts, you get a living profile in which every interaction is captured, dated, and available for both distribution and reporting.
With Activities you can:
- Store transactional and event-based records, such as purchases, service visits, and support cases, against the contacts in a Directory.
- Import records from an Excel or CSV file, or connect an external source such as Salesforce or an SFTP server to keep records updated on a schedule.
- Link every record to the correct contact through a Directory Lookup, so each interaction is attributed to the right person.
- Direct feedback to a second Directory — for example, the employee who handled the interaction — using Feedback Recipient Mapping.
- Use Activity fields as filters, segments, and comparison dimensions in Dashboard reporting.
Navigate to
- Where to Find Activities
- How Activities Work
- Ways to Build an Activity
- Create an Activity
- Respondent Mapping
- Feedback Recipient Mapping
- Activity Field Types
- Using Activity Data in Reporting
Where to Find Activities
Activities live inside a Directory, so a Directory must already exist before you can create one. The navigation path is Directories → [your Directory] → Activities.
- In the top-left corner of your screen, click Directories. The list of Directories in your account opens.
- Click the Directory in which you want to create or review an Activity. The Directory opens on the All Contacts tab.
- Click the Activities tab, next to the All Contacts tab. Every Activity created for this Directory is listed here.
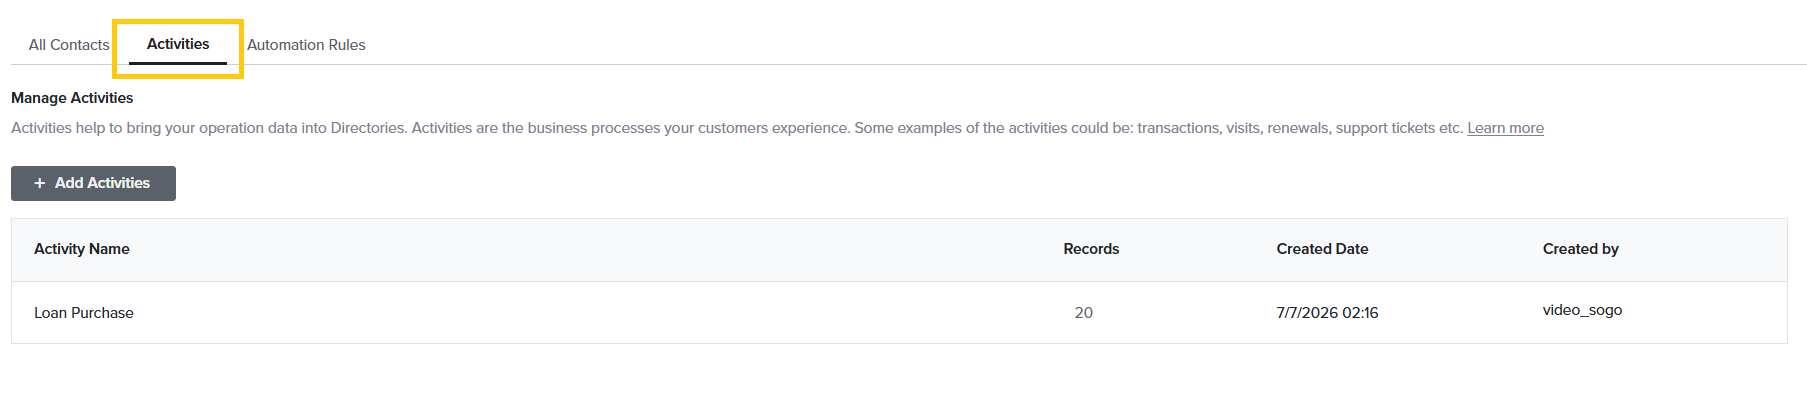
Each Activity has its own set of fields, and each record in the Activity is connected to a contact in the parent Directory through a Directory Lookup — a mapping rule that matches a unique identifier field in the Directory, such as Email Address, to a field in the Activity, such as Customer Email.
That link is what allows a single response to carry the full context of an interaction. Once an Activity record is linked to a contact, a response collected against it inherits:
- Who gave the feedback — the contact attributes held in the parent Directory.
- What the feedback is about — the attributes stored on the Activity record itself, such as product, store location, or amount.
- When it happened — the date or date-time field on the Activity record.
- Who it is about — the attributes of a second contact, such as the employee who handled the interaction, when Feedback Recipient Mapping is configured.
A Directory must exist before you can create an Activity. If you have not built one yet, create the Directory and import your contacts first. A maximum of 50 Activities can be added per Directory.
Ways to Build an Activity
Records can be imported into an Activity from two sources. Both use the same import wizard and differ only in where the records come from and whether the import repeats.
- From a file — upload an Excel or CSV file containing the records. Use this for a one-time load or for periodic imports you manage yourself. The maximum file size is 25 MB. Enable My file has a header when the first row of the file contains column labels, so that row is excluded from the imported records.
- From External Sources — connect Salesforce or an SFTP server. Use this when records should be imported automatically on a schedule. You define an automation rule with a frequency of Daily, Weekly, Monthly, or a Custom schedule, set start and end dates, and enable email alerts for successful runs, failures, and exceptions.
For the full import walkthrough, see Build Activity Using a File and Build Activity Using External Sources.
Create an Activity
Creating an Activity is a two-part process: name the Activity, then import records into it.
- Open the Directory in which you want to create the Activity.
- Click the Activities tab, next to the All Contacts tab.
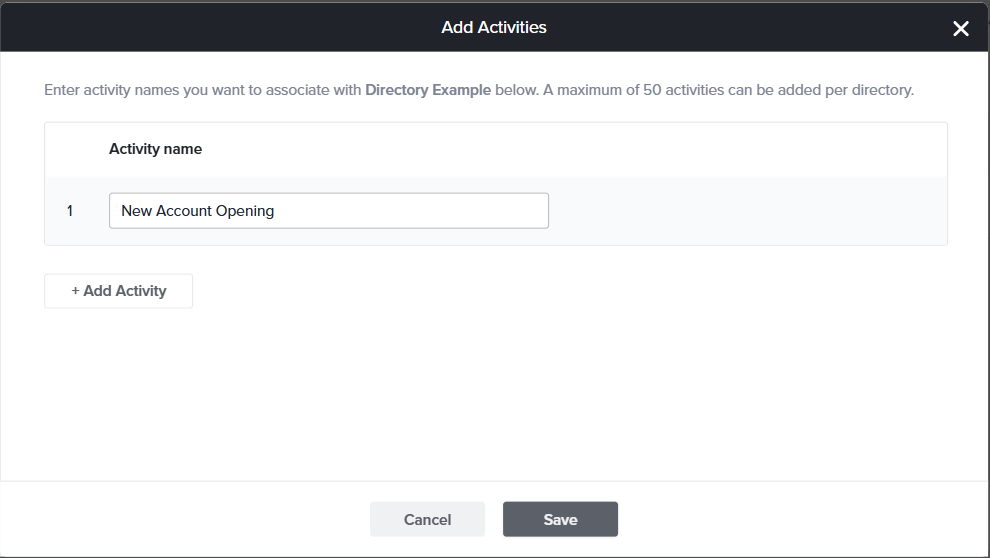
- Click + Add Activities. A dialog box opens.
- Enter a name for the Activity you want to associate with this Directory.
- To create more than one Activity at a time, click + Add Activity and enter the next name. Repeat for each Activity you need.
- Click Save. The new Activities appear under the Activities tab.
- Hover over the Activity into which you want to import records and select Import Records.
- Select the source for the records — From a file or From External Sources — and click Continue to open the import wizard.
- At the Define Directory Lookup step, configure Respondent Mapping and, if required, Feedback Recipient Mapping. Click Continue.
- At the Map Fields step, set the field type for each imported field, then click Continue. The mapped fields are evaluated against their defined field types and the valid records are imported into the Activity.
Respondent Mapping
Use Respondent Mapping when the survey respondents are contacts in the same Directory that holds the Activity. This mapping is what links each Activity record to its contact, and it is configured for every Activity.
- At the Define Directory Lookup step of the import wizard, select the Directory Field you want to use for the lookup.
- Map it to the corresponding Activity Field.
- Click Continue to move to the Map Fields step.
The parent Directory field selected for Respondent Mapping must exactly match one of the fields in the Activity. Once the mapping is created, it cannot be edited. If changes are required, delete the Activity and create a new one.
Feedback Recipient Mapping
Use Feedback Recipient Mapping when the subject of the feedback belongs to a different Directory — for example, employees, vendors, or service providers. The respondent still comes from the parent Directory; the feedback recipient is pulled from the second Directory.
- At the Define Directory Lookup step, toggle on Create Feedback Recipient Mapping.
- Select the Directory from which the feedback recipients will be pulled.
- Choose the appropriate Directory Field.
- Confirm that it matches the corresponding Activity Field.
- Click Continue.
The Feedback Recipient Directory must be different from the Respondent Directory. As with Respondent Mapping, the mapping cannot be edited after it is created.
Activity Field Types
At the Map Fields step, every imported field is assigned a field type. The system detects some field types automatically. Fields it does not recognize can be imported as Custom Fields and assigned the appropriate field type manually.
| Field type | Used for |
| String | Text-based information: any combination of letters, numbers, and symbols. |
| Email addresses. | |
| Number | Integer values. |
| Date | Dates in MM/DD/YYYY, DD/MM/YYYY, or YYYY-MM-DD format. |
| Time | Times in hh:mm or hh:mm:ss format. |
| Date-Time | Date and time in MM/DD/YYYY hh:mm, DD/MM/YYYY hh:mm, YYYY/MM/DD hh:mm, MM/DD/YYYY hh:mm:ss, DD/MM/YYYY hh:mm:ss, or YYYY/MM/DD hh:mm:ss format. |
| Boolean | Boolean values such as 1|0, Yes|No, Y|N, or True|False. Values are normalised to True and False after importing. |
| Phone | Phone numbers. |
| URL | Web addresses. |
To set the country code for a phone field, click the gear icon next to the Field Type column.
Using Activity Data in Reporting
Once records are imported, Activity fields become available alongside contact fields across reporting, so you can analyze feedback by the details of the interaction rather than by the respondent alone.
- Filter Dashboard data based on activities within Directories. On a Custom Dashboard, select the Directory from the dropdown, then choose Attributes and Metadata to filter records.
- Assign Activity fields to rows and columns in the Cross Tab Widget to examine relationships between Activity attributes and survey results.
- Segment and compare responses by Activity attributes, such as store location, product line, or service type.
Activity fields appear in reporting only after records have been successfully imported and linked to contacts through the Directory Lookup.
See also
Subscribe for tips and insights to drive better decisions!