


Adding Sub-Users
As your team grows, you can add sub-users to your Sogolytics account. Each sub-user has their own login, and you can set permissions, apply Data Visibility Rules, and configure workflow approvals based on their role.
Navigate to
Buying Sub-User Licenses
Before creating a sub-user, check how many licenses you have available.
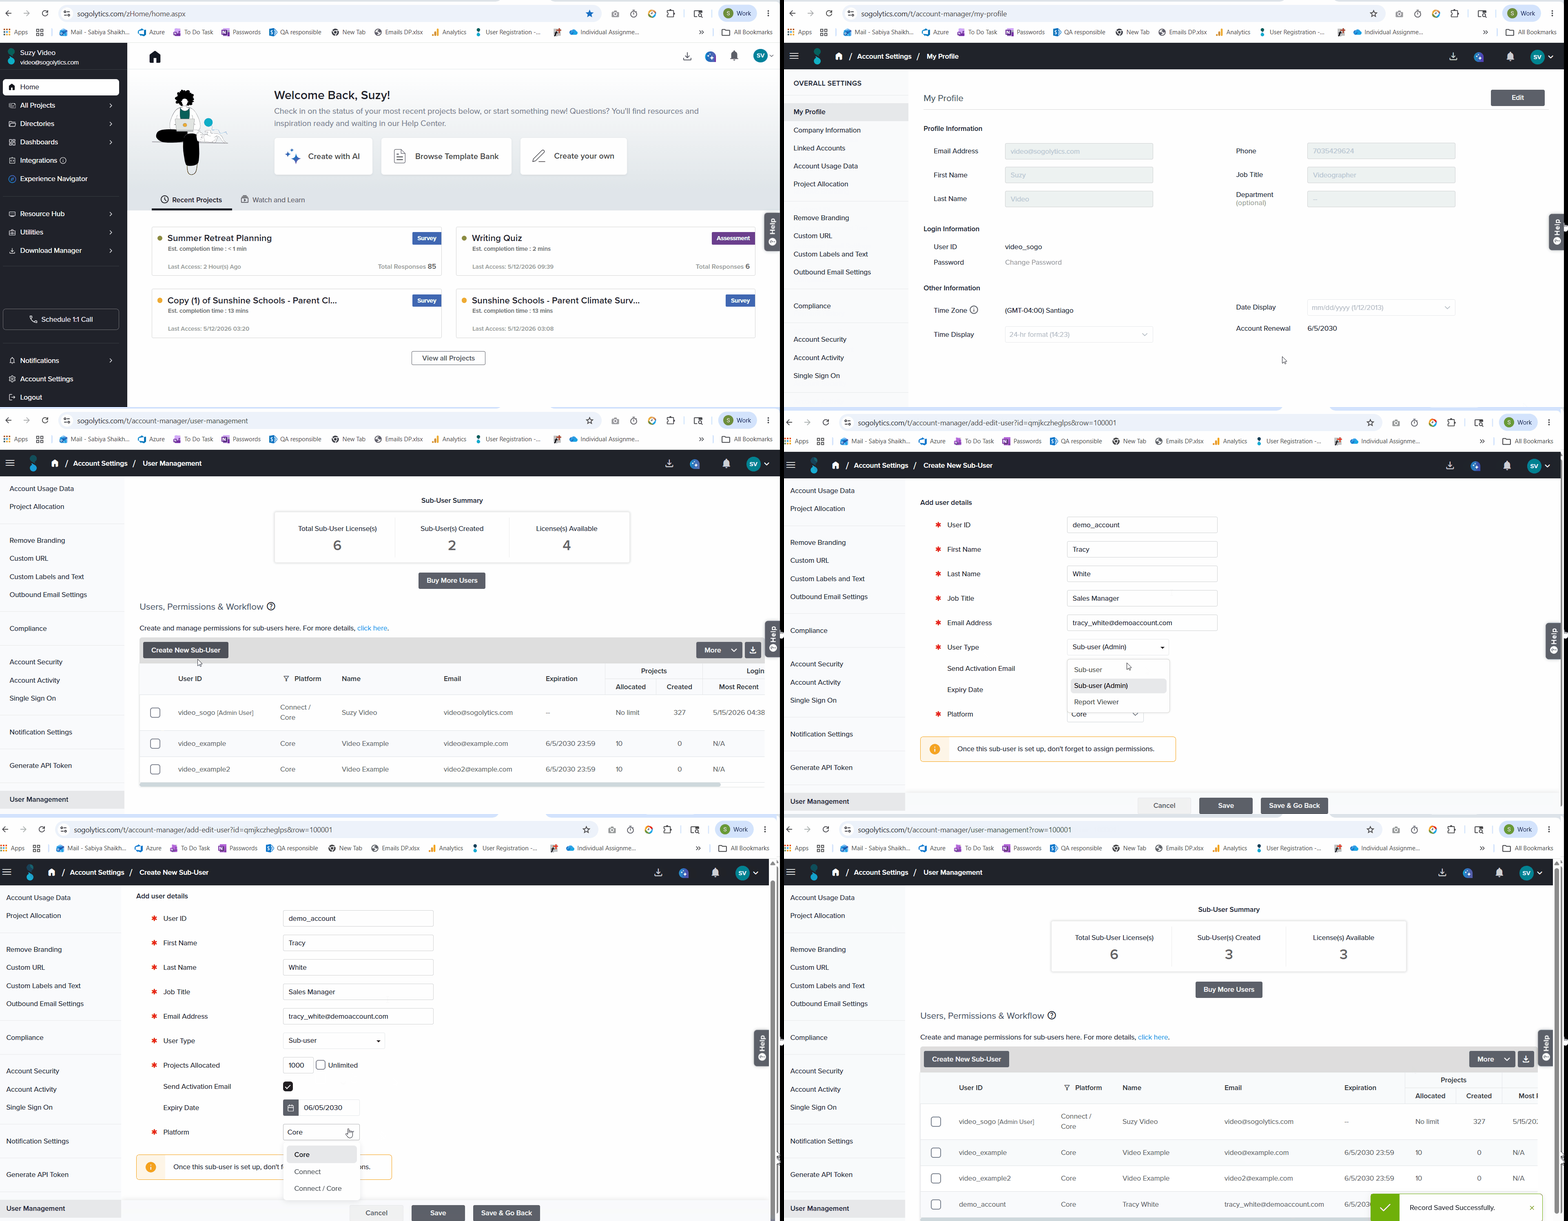
- Click your account initials in the top right corner and choose Account Settings.
- Choose User Management from the bottom of the menu on the left.
- Review your available licenses in the Sub-User Summary at the top of the screen.
- If you need more, click Buy More Users and enter the number of sub-accounts you’d like to add.
- Click on Pay Now.
- You’ll be redirected to the Billing page. Enter your details and click Submit.
- On the Confirmation page, click Submit to proceed. Once the transaction is successful, click Continue to your account.
- The new sub-accounts are added to your account, and the updated count appears in the summary cards at the top of the User Management page.
If you do not wish to make the payment immediately, you can choose the Pay Later option. Using this option, the requested number of sub-accounts will be added to your account instantly. An invoice for the purchase will be sent to you, which can be paid at your earliest convenience.
Creating a new Sub-User
- On the User Management page, click Create New Sub-User.
- Enter the sub-user’s details: User ID, First Name, Last Name, Job Title, and Email Address.
- Select the User Type from the following:
- Sub-user: The default option. The user gets module-level permissions assigned by the admin.
- Sub-user (Admin): The user gets full platform access with administrator rights.
- Report Viewer: A read-only user with access to dashboards and directories only. Survey creation and administrative modules are not available.
- Allocate the number of projects this user can create, or select Unlimited.
- The Project Allocation field is hidden for Report Viewer accounts, as they do not have permission to create projects.
- The allocated project limit is deducted from the overall project limit of the parent admin account. For example, if the parent account has a limit of 1000 projects and 500 projects are allocated to a sub-user account, the remaining limit for the parent admin account will be 500 projects.
- Choose whether to send the activation email immediately or at a later time. If you choose not to send it right away, you can later use the Send Activation Email option available on the User Management Dashboard.
- Set the Expiry Date for the sub-user’s access.
-
Select the Platform whose access you want to give to this user from the dropdown. You can choose from the following:
- Core: Provides access to the Sogo Core survey platform only.
- Connect: Provides access to the Sogo Connect ticketing platform only.
- Core/Connect: Provides access to both the Sogo Core and Sogo Connect platforms.
- Click Save, or Save & Go Back to return to the User Management page.
Change the User Type
If a team member’s role changes, you can edit the sub-user account and update the User Type at any time.
To do this, go to the User Management Dashboard and select the sub-user whose user type you want to change. Then click Edit. On the Edit User Details page, update the User Type as needed.
When you change the user type, the available permission areas are adjusted automatically. Similarly, for Report Viewer user types, modules that do not apply to Report Viewers are automatically hidden once the user type is changed.
Good to Know:
- After creating a sub-user, remember to assign permissions. You’ll see a reminder on the Add User Details page.
- You can update project allocation any time under Project Allocation in Account Settings.
Subscribe for tips and insights to drive better decisions!