


Set up Automated Distribution
Setting up automated distribution rules allows you to plan and deliver email or SMS invitations and reminders based on the schedule of your choice, simplifying your processes and avoiding repetitive manual tasks.
This feature is available as à la carte feature in our Enterprise plan. Contact us to take advantage of this option.
Ready to get started? There are three questions you need to answer before you begin.
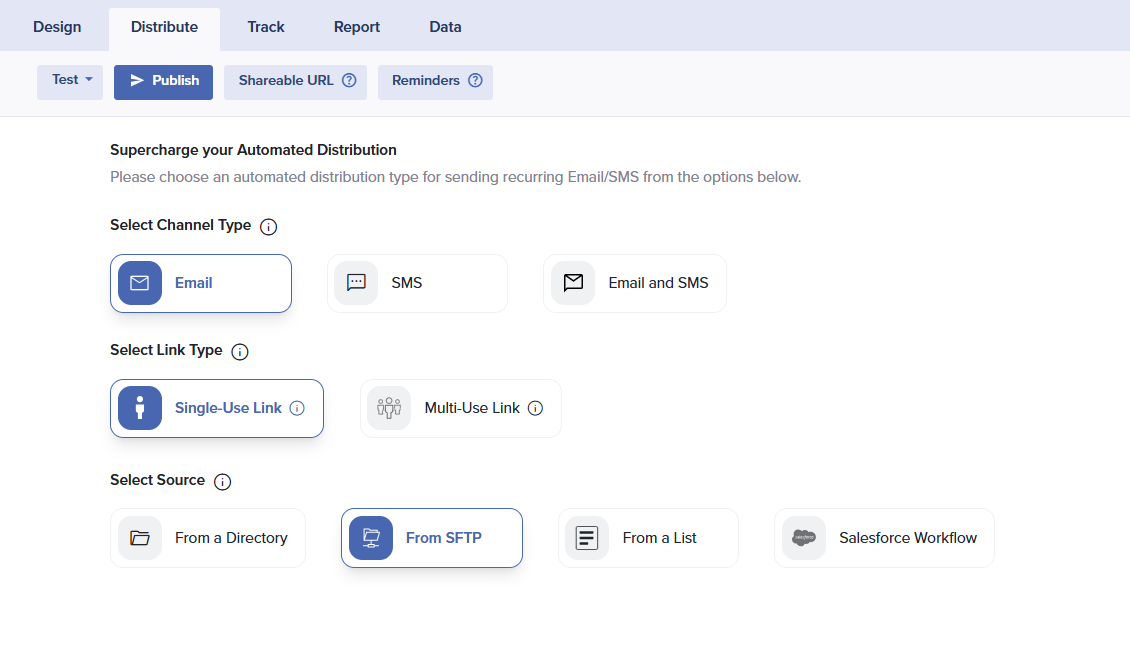
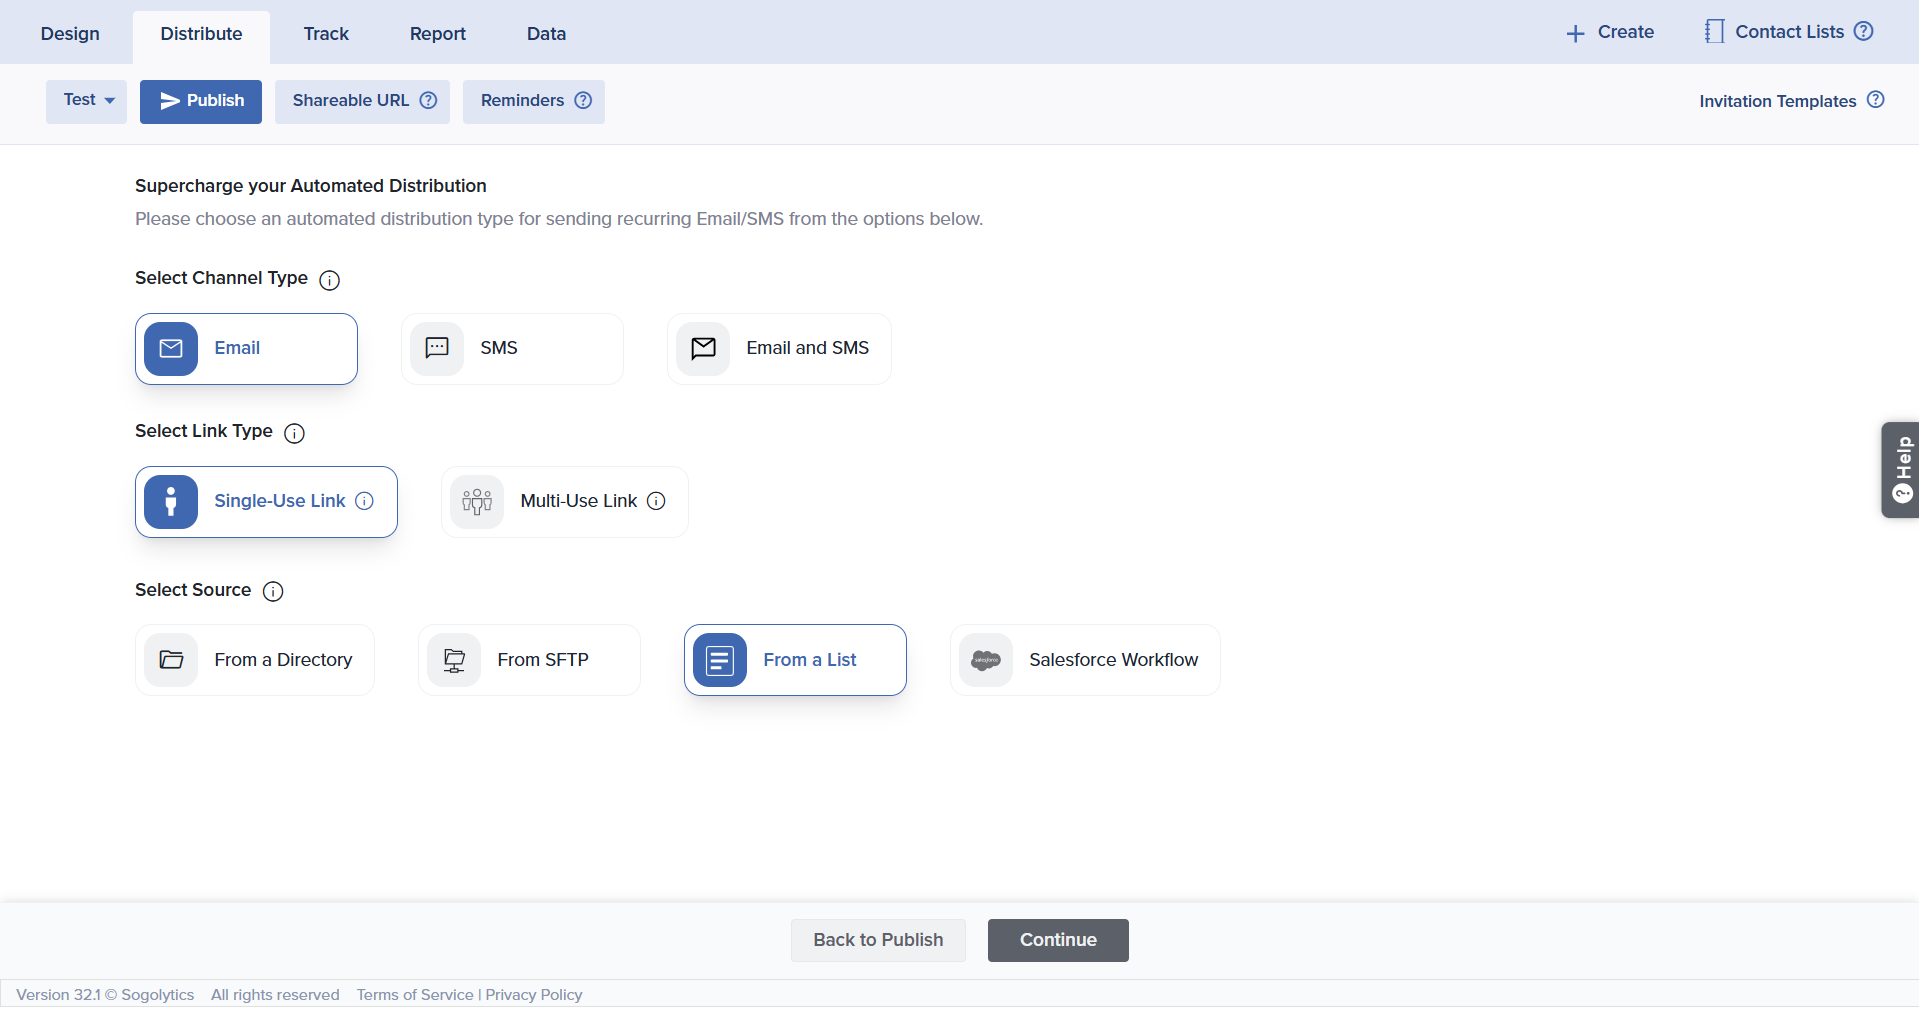
Q1: Which distribution channel will you use? Choose Email, SMS, or Email + SMS [sends the same link simultaneously to both email address and mobile number].
Q2: Which type of link will you send? Select single-use [allows a single response] or multi-use link [allows multiple responses].
Q3: Which source will your contacts come from? Choose Directory, SFTP, Contact List, or Salesforce Workflow.
Navigate to
- Automated Distribution Using Directory
- Automated Distribution Using Secure File Transfer Protocol (SFTP)
- Automated Distribution Using a List
- Automated Distribution Using a Salesforce Workflow
First, decide on your distribution channel and link types:
- Channel Types: Email, SMS and Email + SMS.
- Link Type: Single Use Link and Multi Use Link.
- Single-Use Link:
- Unique link that only allows a single response.
- Single-Use Links should not be sent to group email addresses.
- These invitations should not be forwarded.
- Multi-Use Link:
- Multiple/duplicate participation (ballot box stuffing) cannot be prevented.
- Each invitee will have different links that can be used multiple times.
- Single-Use Link:
For Automated Distribution, Multi-Use Links can only be distributed via Email, not SMS or Email+SMS.
Then, set up an Automated Distribution Rule using any of the following sources:
- Directory
- SFTP
- List
- Salesforce Workflow
Automated Distribution Using Directory
To set up an Automated distribution rule using a Directory:
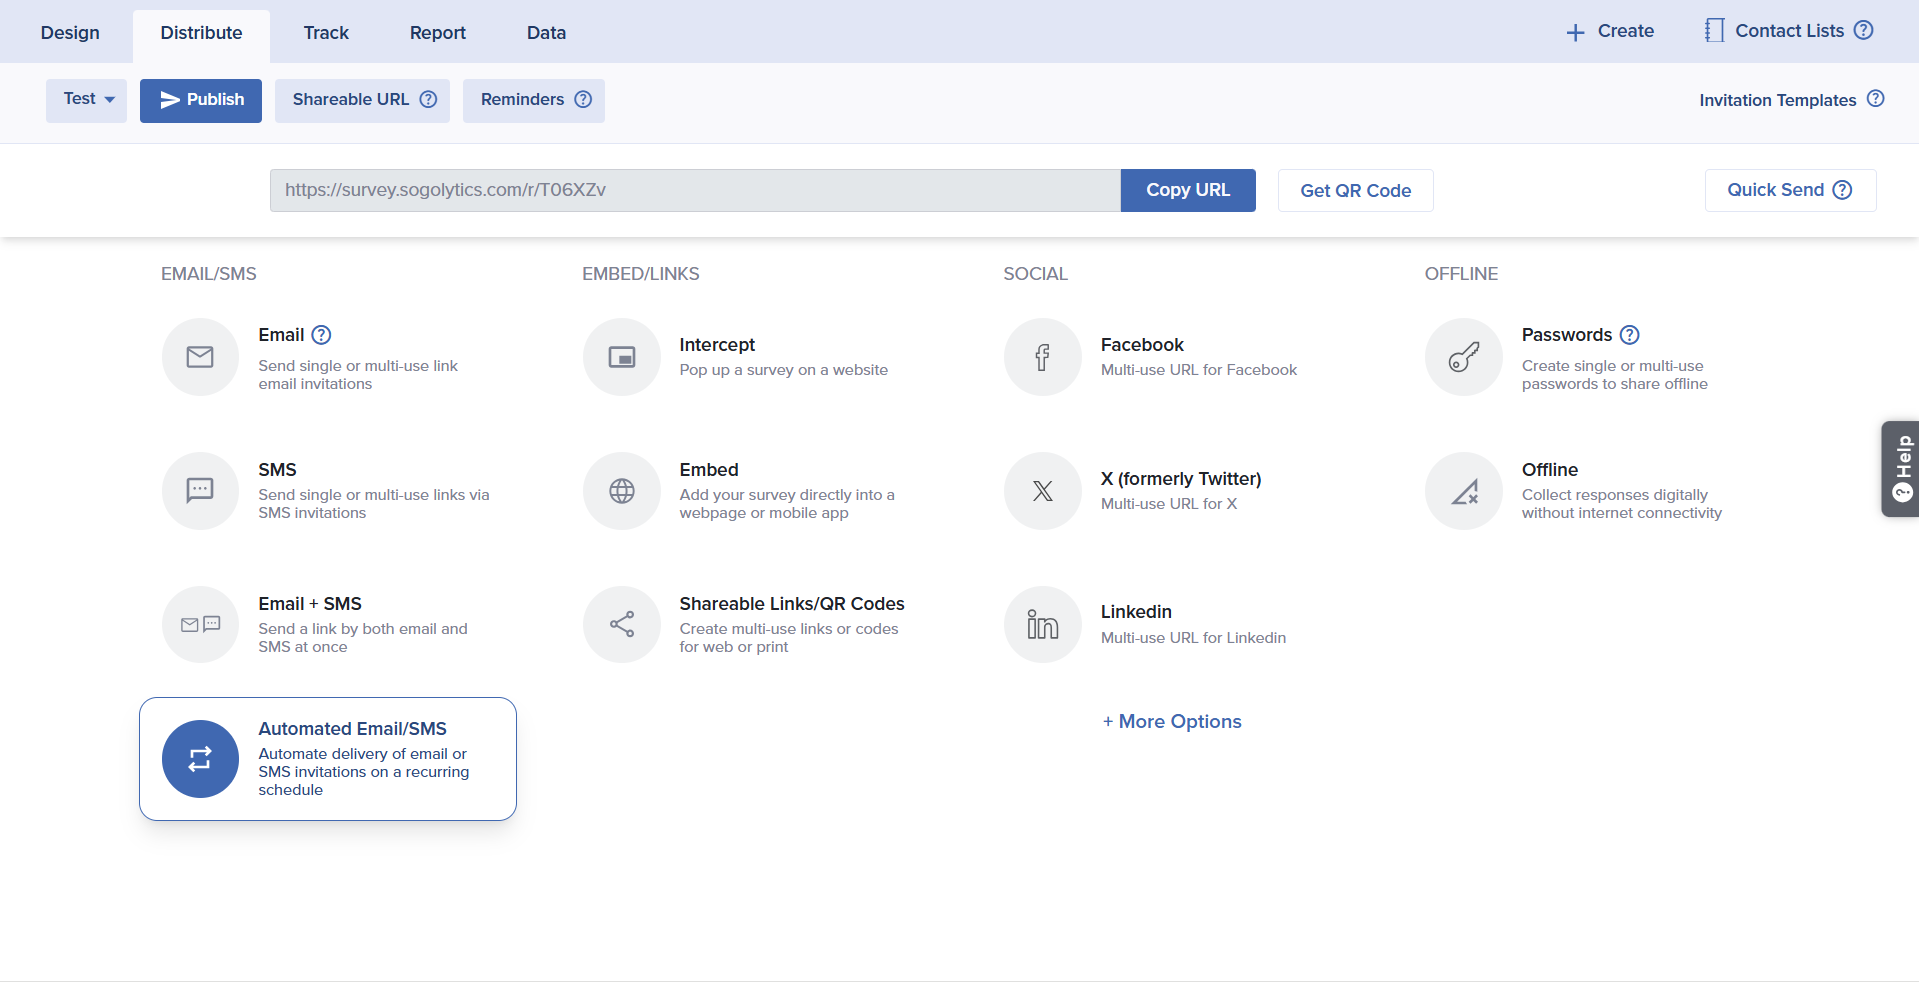
- Select your project, then click on the Publish icon.
- At the bottom of the Email column, select Automated Email + SMS.
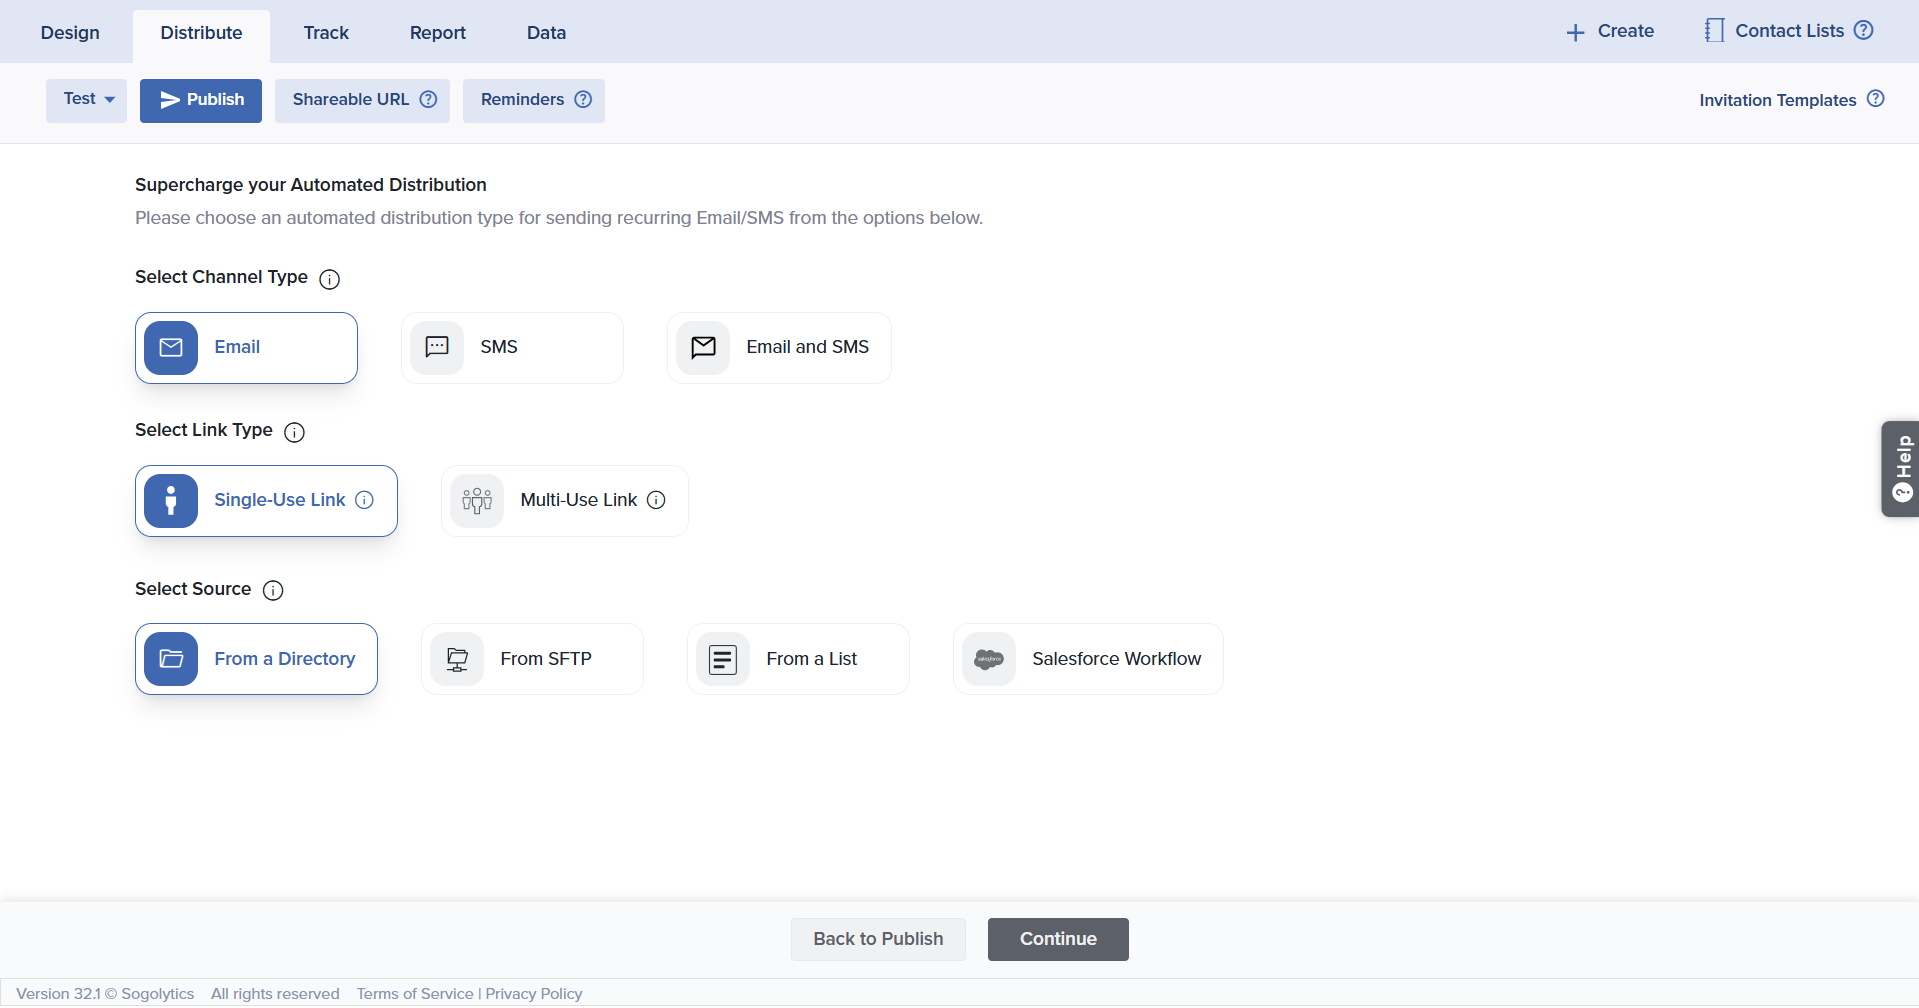
- Select the Channel Type and the Link Type. Select From a Directory as the Source of Automated Distribution.
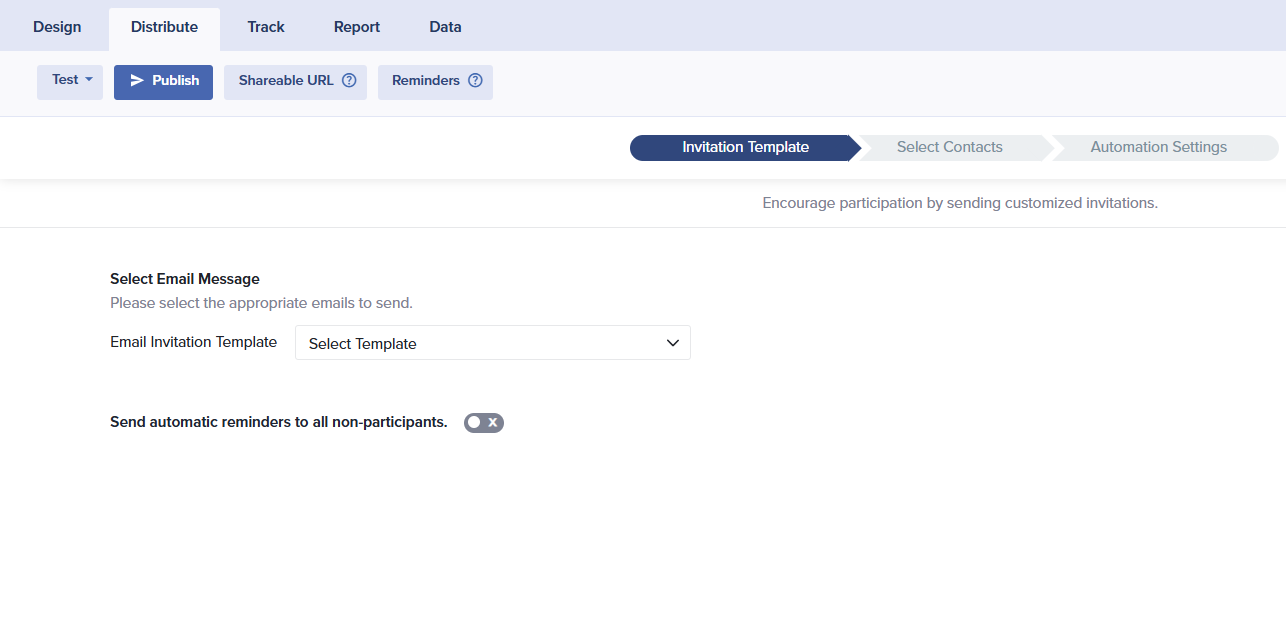
- Next, select the Invitation Template and the Auto Reminder Template for your Email invitation. If you have selected either the SMS or Email + SMS link types, you will also see an option to select Email and SMS templates based on your chosen distribution method. Click Continue.
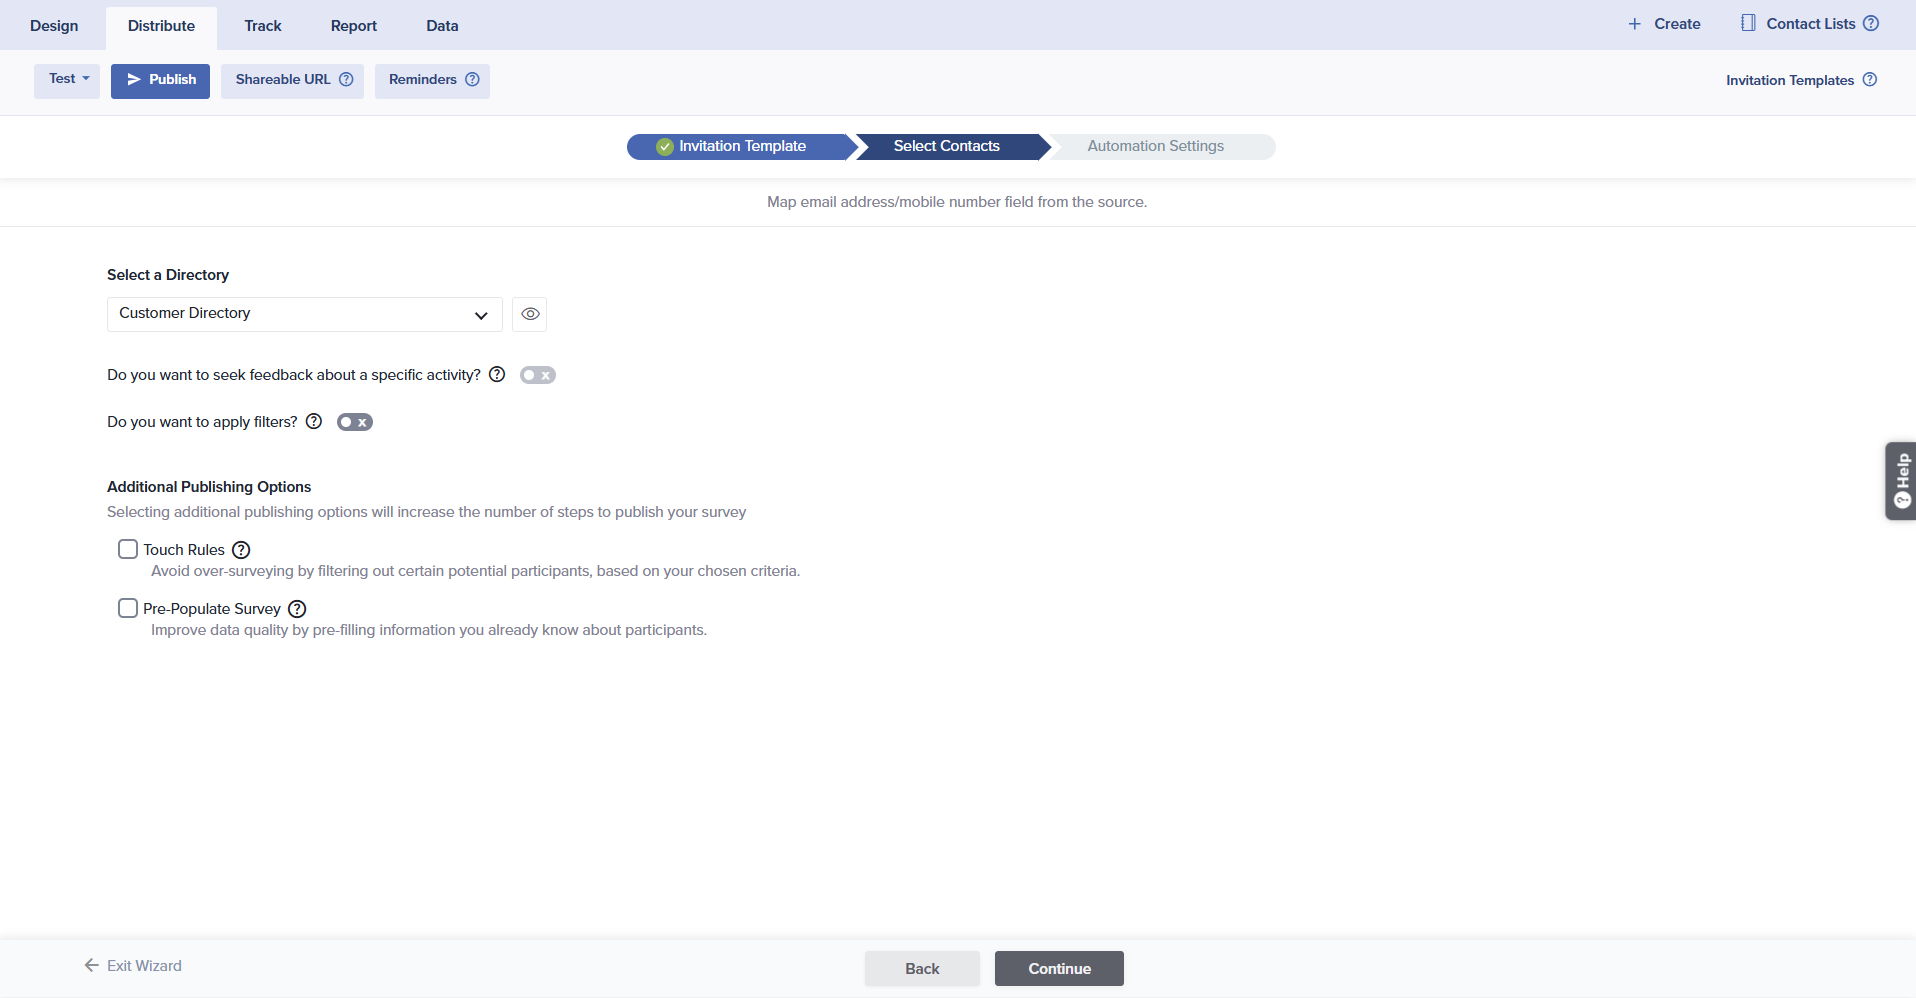
- Select a Directory to distribute your invitations. You can use the additional publishing options to apply Touch Rules or apply Pre-population. If pre-population is already applied to your project, this option will be pre-selected for you. Click Continue.
- Set up the rules for automated distribution. Options include:
- Schedule Automation Rule: Set a time when contacts will be added or updated.
- Contact Selection Criteria: Send invitations only to contacts that meet selected conditions. If both conditions are selected, contacts must meet both criteria.
- Contacts that have been Added, Updated or Upserted since the last distribution run.
- Send only to contacts with the current date in a selected column.
- Schedule Reminders: Send reminders to eligible addresses on the chosen schedule.
- Invitation Expiry: Expire invitations after a set time period.
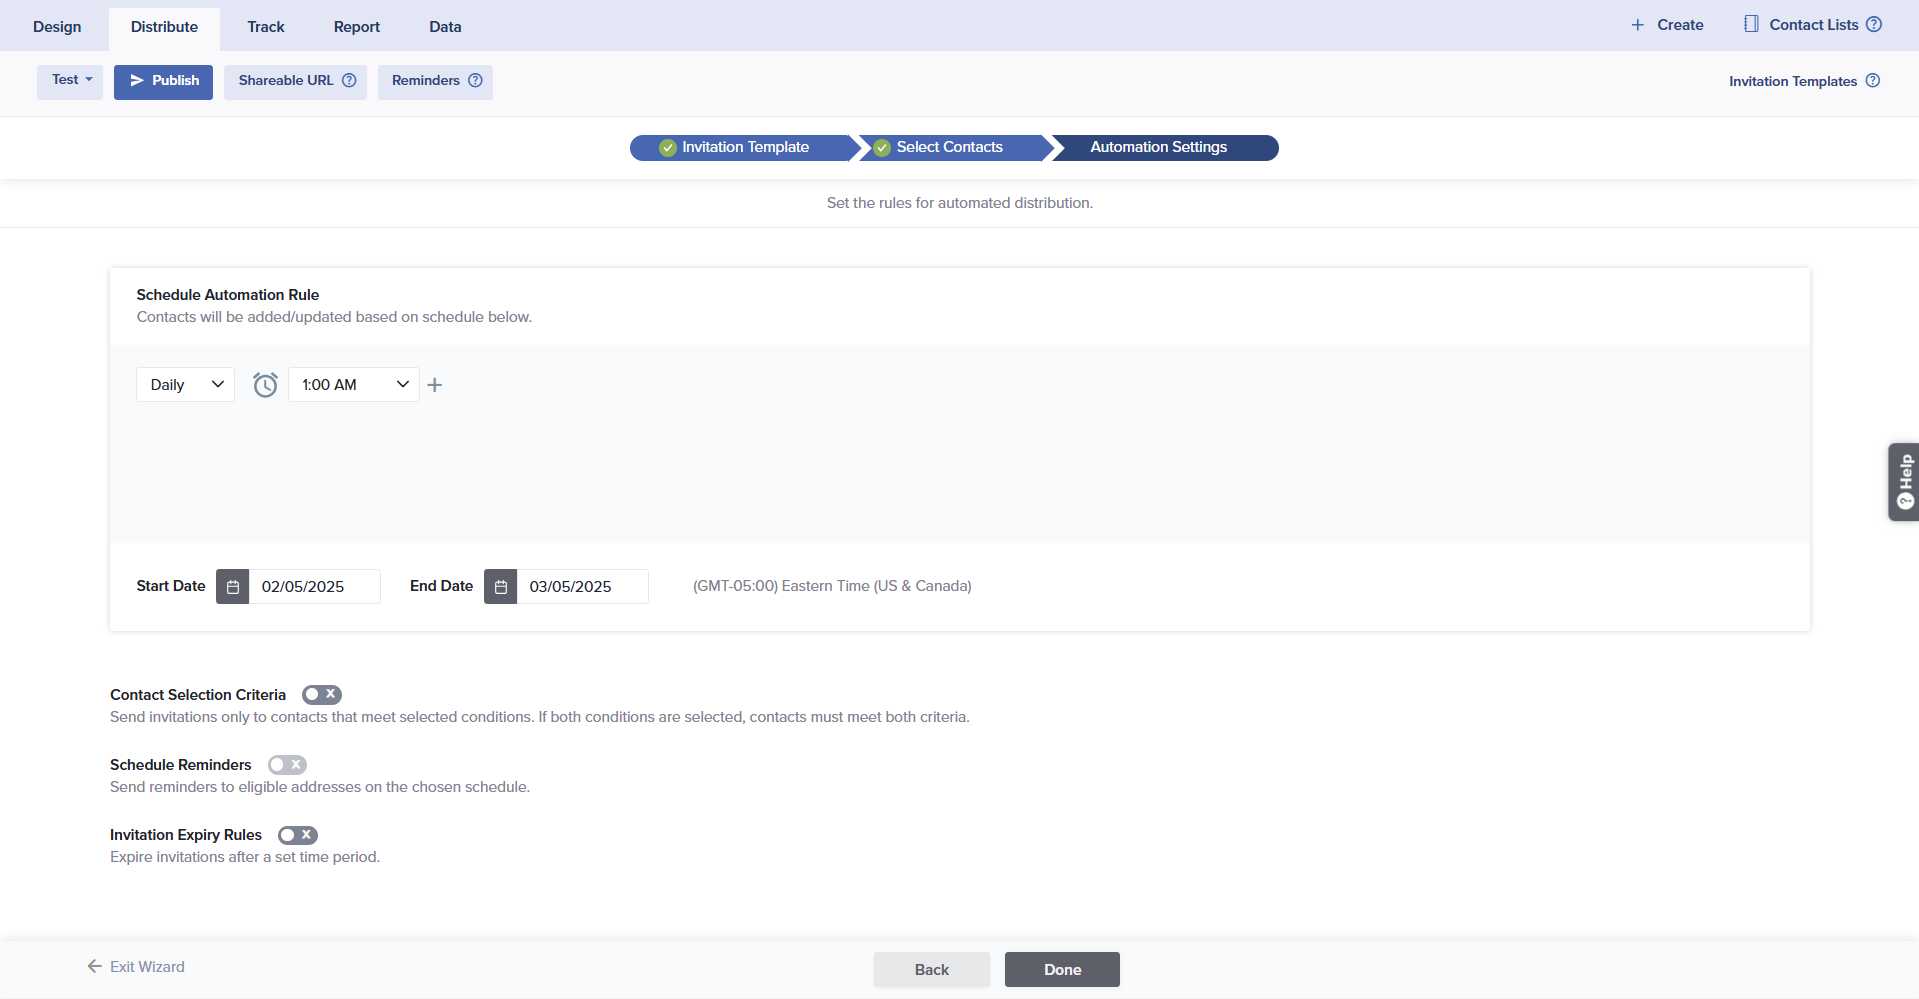
- Once all settings are structured to your liking, click Done to run the rule.
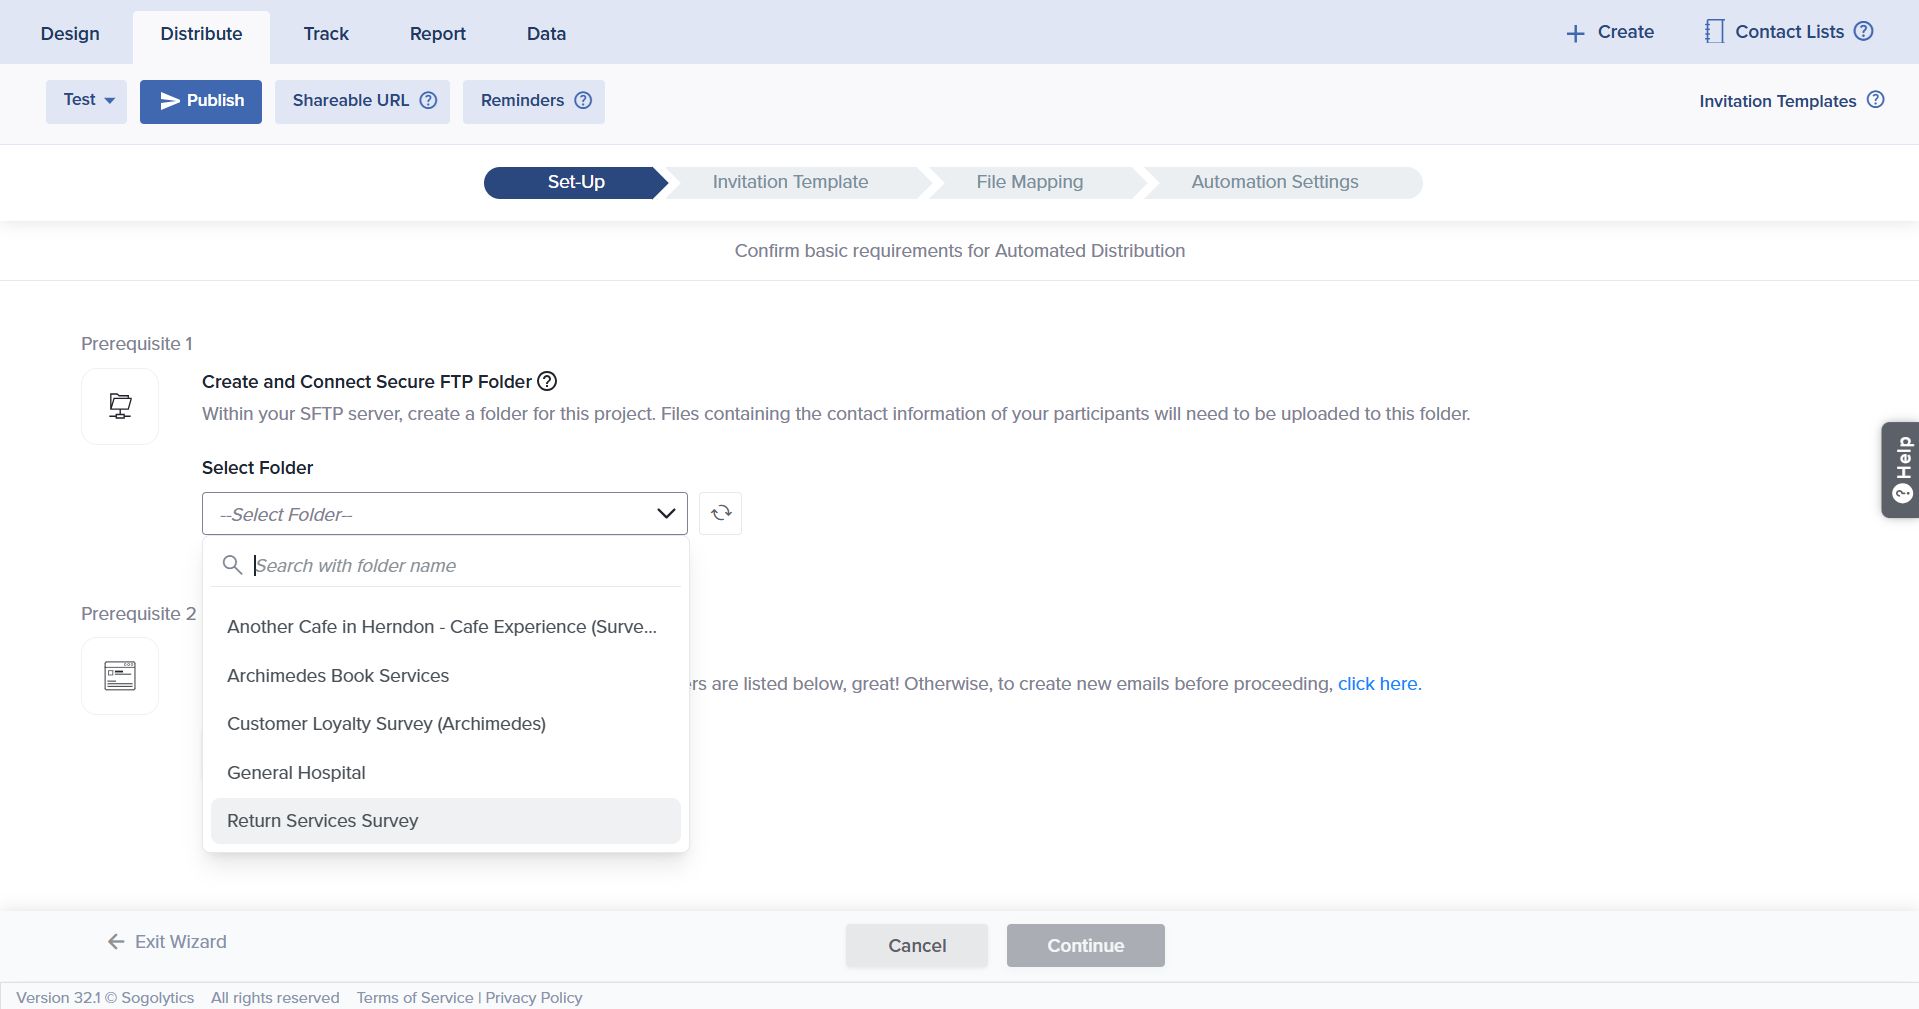
Automated Distribution Using Secure File Transfer Protocol (SFTP)
Before you proceed, create a folder for each project on the SFTP server linked to your account. Click here to learn more about SFTP folder setup.
To set up an Automated distribution rule using SFTP folders:
- Select your project, then click on the Publish icon.
- At the bottom of the Email column, select Automated Email + SMS.
- Select the Channel Type (either Email or Email and SMS) and the Link Type. Select the source of Automated Distribution as From SFTP.
- Set up your prerequisites.
- Create and Connect Secure FTP Folder: select the relevant project folder from the drop-down. If your folder is not visible in the drop down, click on refresh icon beside the drop-down to refresh the folder list.
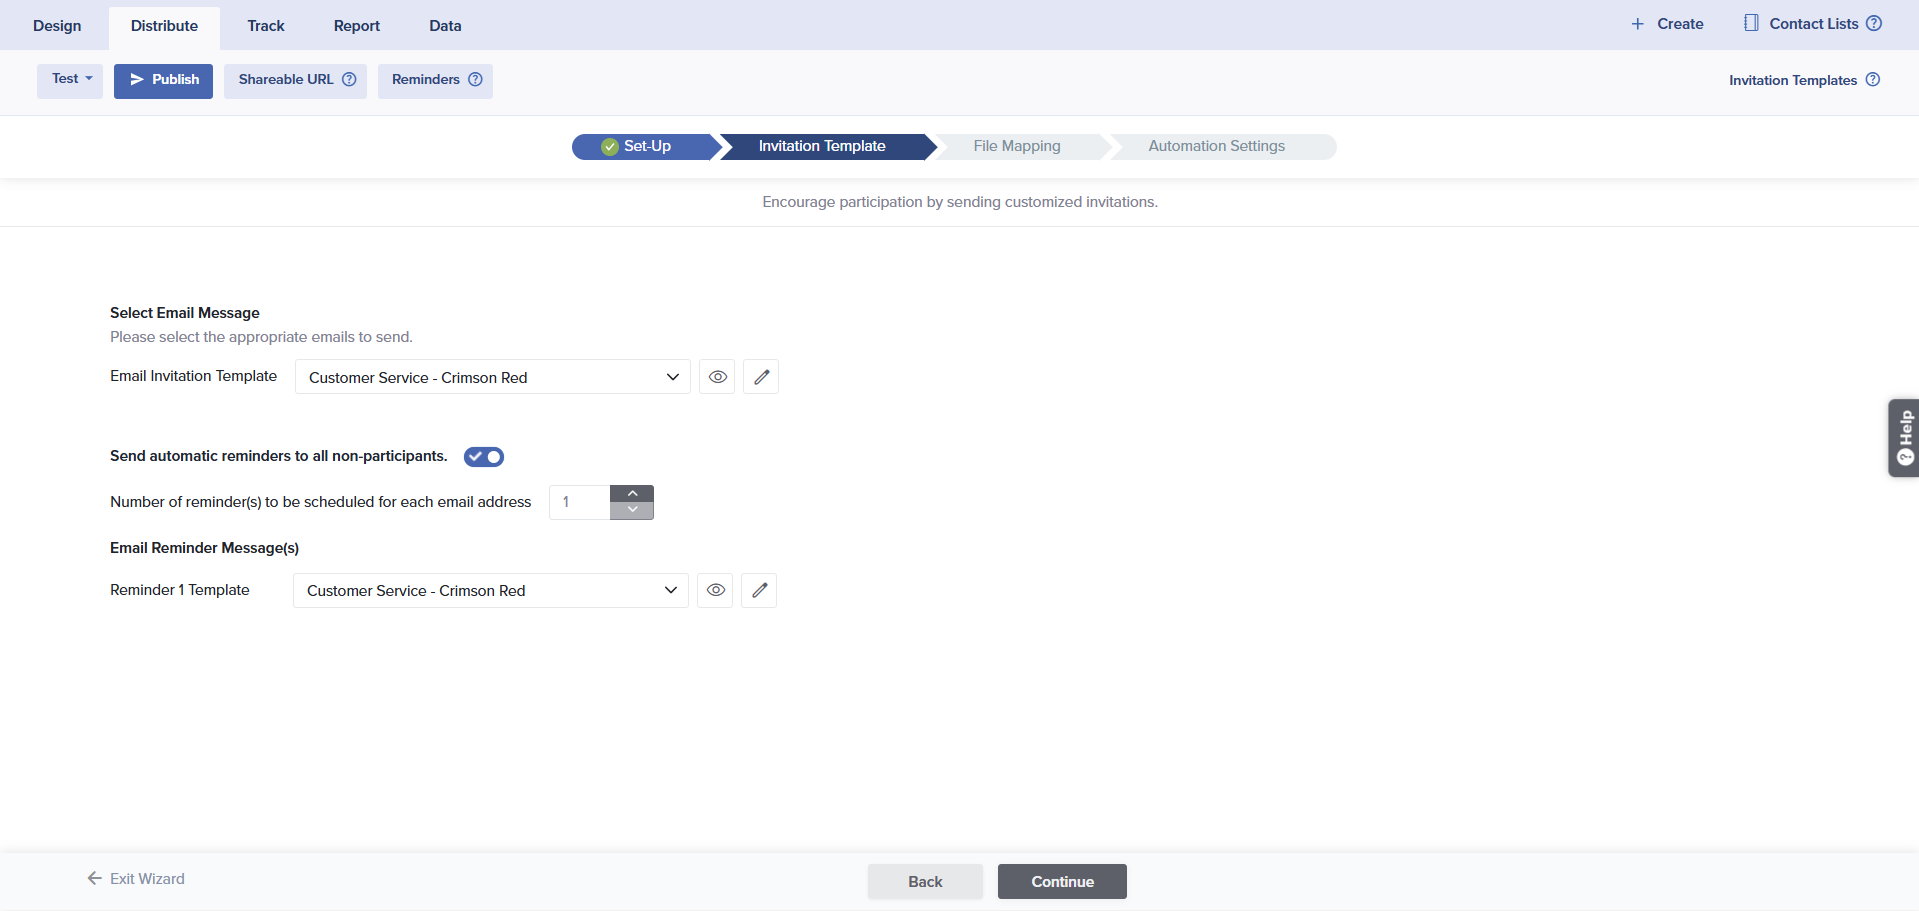
- Invitation Templates: Review the Available Email Messages to use as Invitation Templates. If you do not see or have not yet created the right template for invitations or reminder(s), click Email Templates in the top right corner to create them now. Learn more about creating Email Invitations here.
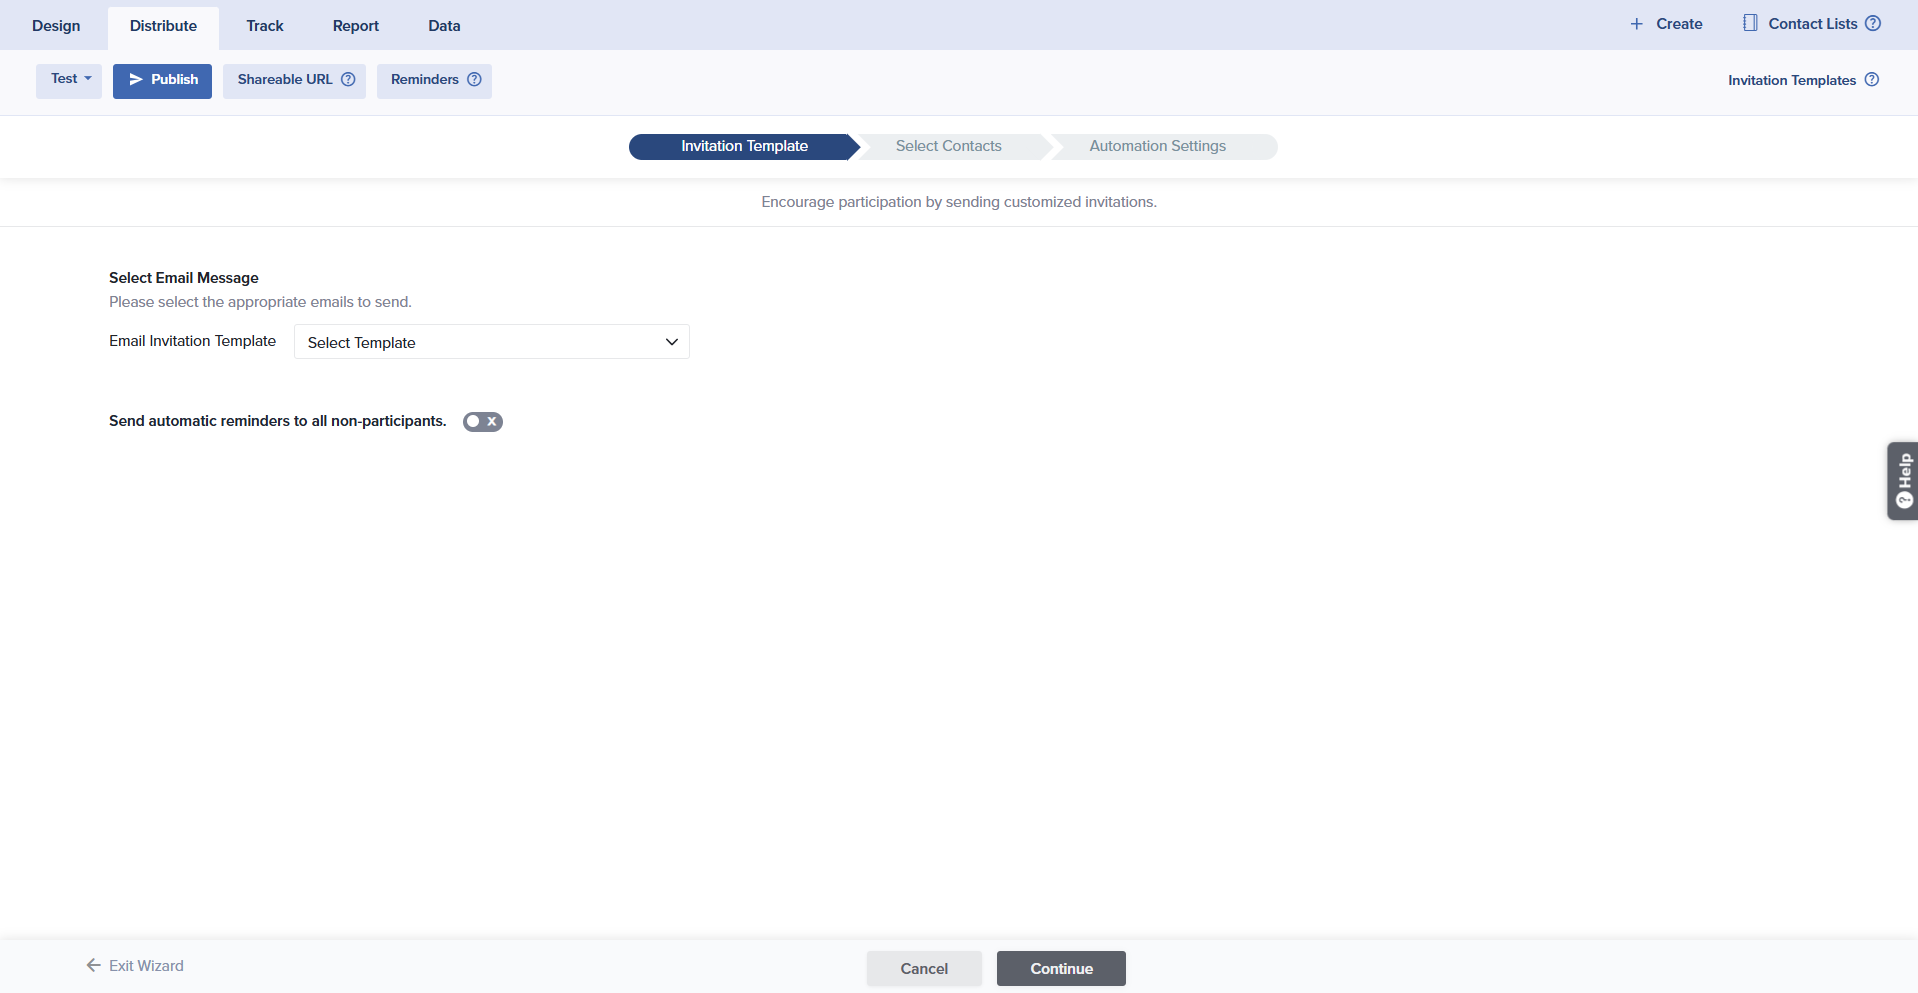
- Next, select the Email Invitation Template you will use to distribute your project. You can also choose to set up automatic reminders by toggling on Send automatic reminders to all non-participants. Then, schedule the number of reminders to be sent out and select a template for each reminder. You can use the same template, or a different template each reminder. Click Continue when finished.
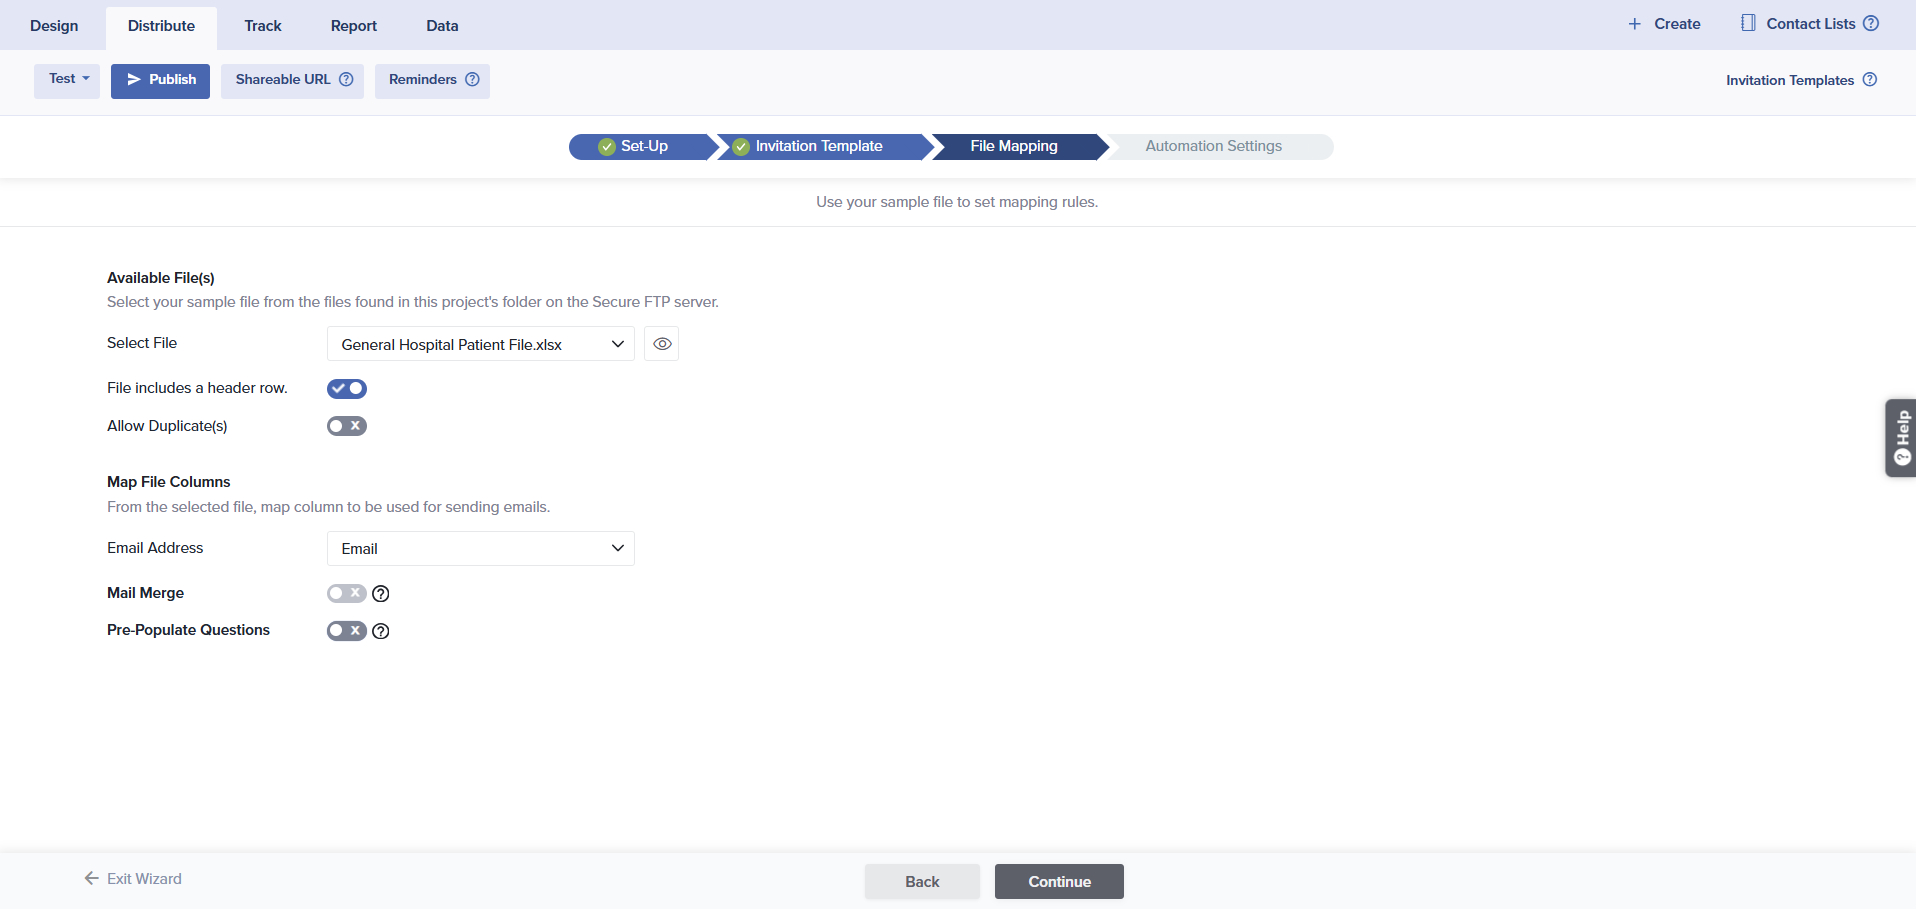
- Select the distribution file from the project’s folder on the Secure FTP server that you previously set-up.
- Select whether or not your file includes a header row and if you’d like to allow duplicate contact entries
- Select the column used for email
- If you have incorporated Mail Merge into your email invitation or Pre-Population is applied to your project, these options will automatically be toggled on for you and you’ll be able to map this data in another step. Click the links to learn more about these options.
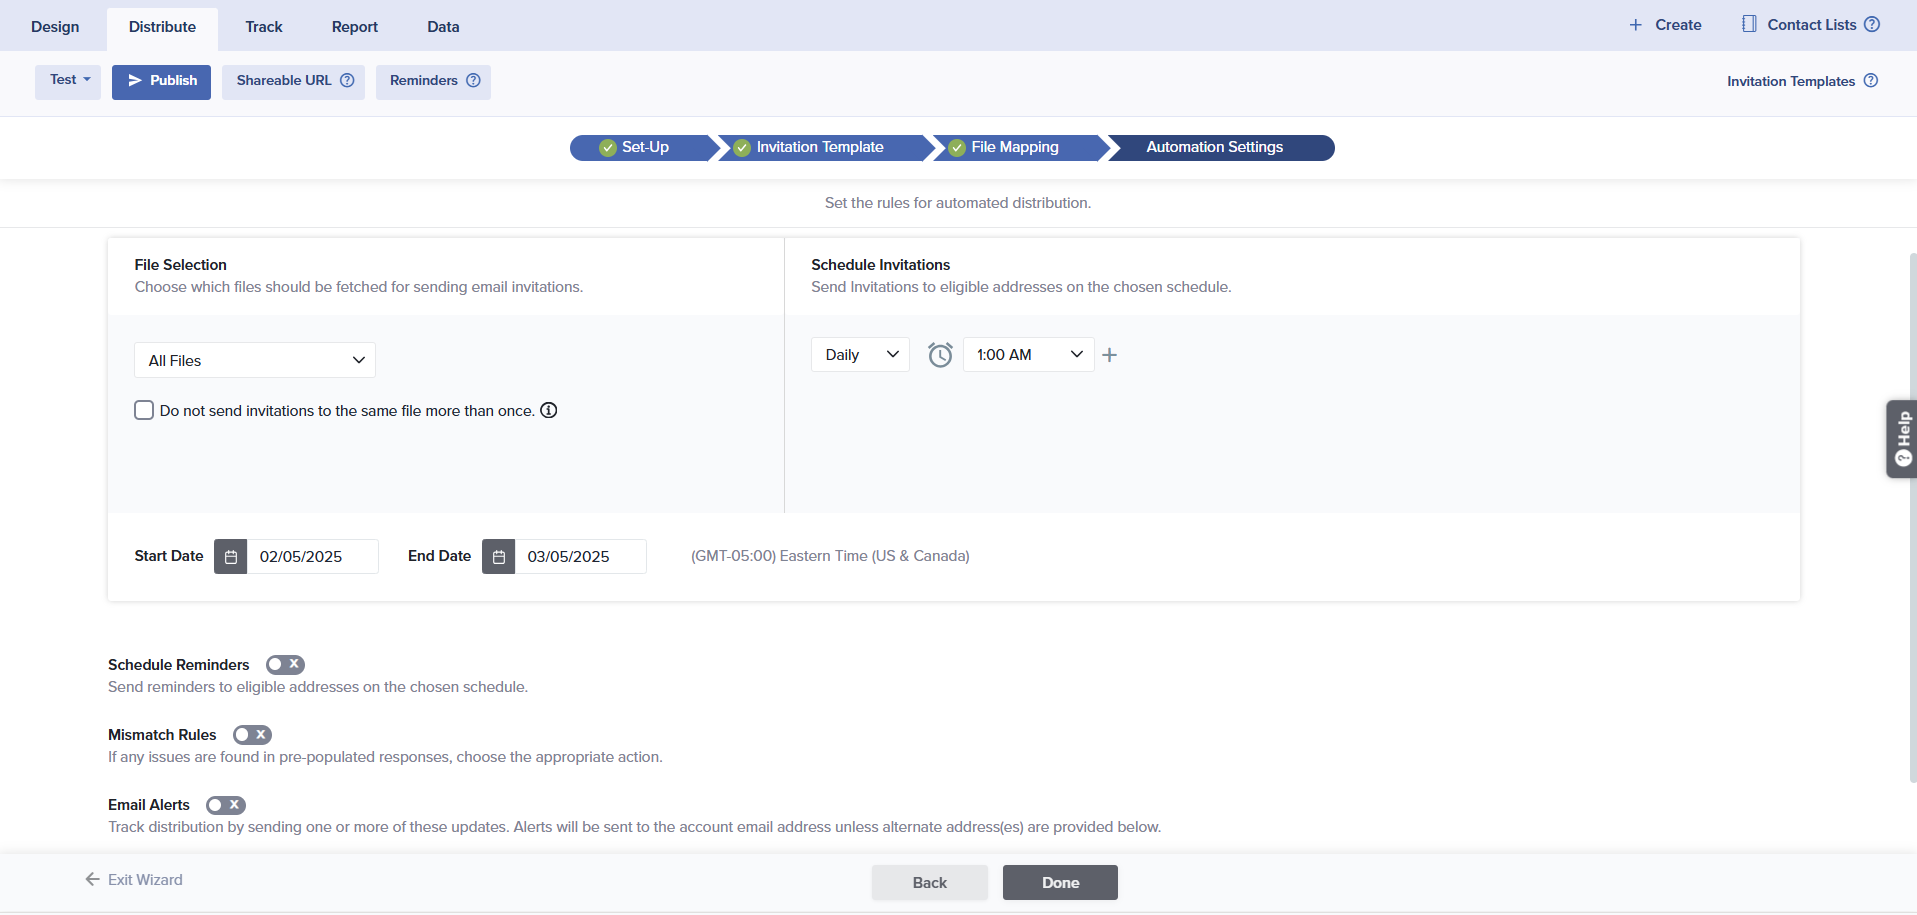
- Set up the rules for automated distribution. Options include:
- File Selection: choose which files should be fetched for sending email invitations. Options for file selection include:
- Latest file
- Unsent files
- Files uploaded in last hours or days
- Selected specific days
- Additional option to not send invitations to the same file more than once
- Schedule Invitations: Send reminders to eligible addresses on the chosen schedule.
- Rule Expiry: Expire the automation rule after a set time period.
- File Selection: choose which files should be fetched for sending email invitations. Options for file selection include:
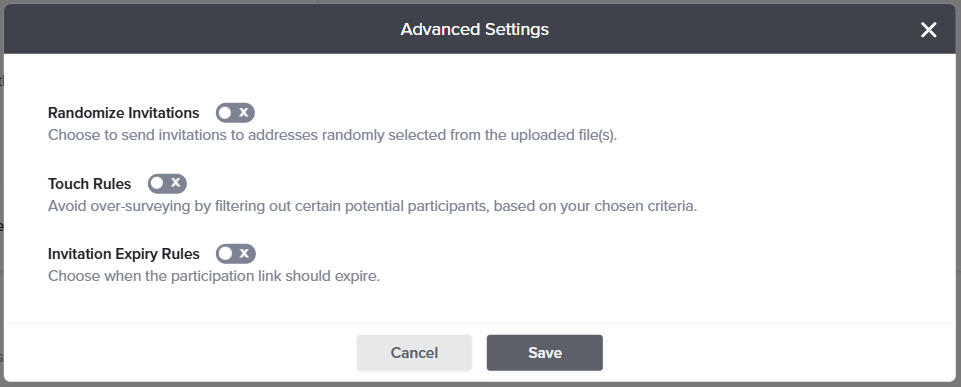
- Use the additional options to schedule reminders, select the appropriate action for mismatch rules, and set email alerts. Advanced settings can be used to randomize invitations, apply Touch Rules and apply participation link expiry rules.
- Once all settings are structured to your liking, click Done to run the rule.
Automated Distribution Using a List
To set up an Automated distribution rule using a Contact List:
- Create a Contact List.
- Select your project, then click on the Publish icon.
- At the bottom of the Email column, select Automated Email + SMS.
- Select the Channel Type and the Link Type. Select List as the Source of Automated Distribution.
- Select the Email Invitation Template you would like to use.
- You can also opt to set up automatic reminders to all non-participants
Click Continue.
- Select the list you will use for distribution. Optionally, you can select a sample size from this list.
- You can use the additional publishing options to apply Touch Rules or apply Pre-population. If pre-population is already applied to your project, this option will be pre-selected for you.
Click Continue.

- Schedule the automation rule. Send reminders to eligible addresses on a Daily, Weekly, Monthly, Yearly or Custom schedule.
- Use the additional options to configure contact selection criteria, schedule reminders and set invitation expiry rules.
- Click Done to run the automation rule.
Automated Distribution Using a Salesforce Workflow
Use this feature to send email invitations to Salesforce Contacts, Leads, and other Objects based on specific activity in your Salesforce account.
- In Salesforce, open Workflow Rules (Setup > Create > Workflow & Approvals > Workflow Rules).
- Create a rule and specify triggering conditions.
- Add ‘New Outbound Message’ as a Workflow Action.
- In Sogolytics, make sure your Salesforce account is connected.
- Select your project, then click on the Publish icon.
- At the bottom of the Email column, select Automated Email + SMS.
- Select the Email as the channel type, then select Single-Use Link. Select the source of Automated Distribution as Salesforce Workflow.
- Select the invitation template you will use for distribution. You can also opt to set up Automatic Reminders. Click Continue.
- Select contacts by selecting the Salesforce object to which invites will be sent (example: Contact) and mapping the appropriate corresponding email address field (example: Email). You can use the additional publishing options to apply Touch Rules or apply Pre-population. If pre-population is already applied to your project, this option will be pre-selected for you. Click Continue.
- Set the rules for automated Distribution. Choose to send when the Workflow in Salesforce is Triggered or Send after a delay. You can set a delay based on Hours, Days, Weeks or Months.
- Use the additional options to schedule reminders and set invitation expiry rules.
- Click Done to run the rule.
Subscribe for tips and insights to drive better decisions!

